Community Tip - Visit the PTCooler (the community lounge) to get to know your fellow community members and check out some of Dale's Friday Humor posts! X
- Community
- Augmented Reality
- Vuforia Studio
- Re: RESOLVED: Known Issue: 3D Panel widget is not ...
- Subscribe to RSS Feed
- Mark Topic as New
- Mark Topic as Read
- Float this Topic for Current User
- Bookmark
- Subscribe
- Mute
- Printer Friendly Page
RESOLVED: Known Issue: 3D Panel widget is not functional in Vuforia Studio 9.0.0
- Mark as New
- Bookmark
- Subscribe
- Mute
- Subscribe to RSS Feed
- Permalink
- Notify Moderator
RESOLVED: Known Issue: 3D Panel widget is not functional in Vuforia Studio 9.0.0
As of Vuforia Studio 9.0.2, the 3D Panel widget is available for use.
In an effort to improve the 3D Eyewear authoring experience, we are developing a 3D Panel container widget. However, it was mistakenly included with the 9.0.0 release, and should not be used, as it is not functional. We are actively working on and verifying a fix for this issue and will update this post when it is available.
- Labels:
-
Announcements
- Mark as New
- Bookmark
- Subscribe
- Mute
- Subscribe to RSS Feed
- Permalink
- Notify Moderator
Hi tmccombie,
Thanks for letting us know. Could you give some insight what this widget will do?
Will it enable the authors to group widgets and move them together? Maybe billboarding with multiple labels will work with this.
Regards
Whity
- Mark as New
- Bookmark
- Subscribe
- Mute
- Subscribe to RSS Feed
- Permalink
- Notify Moderator
Hi Whity,
Your comments are on the right track 🙂
We found that 3D eyewear authors want to create user interfaces in 3D space from a group of widgets. The panel will allow hololens widgets to be grouped together. The panel will also provide a background color to make sure widgets don't blend into the background. Future iterations of the panel allow the panel to "follow the user" and be pinned to a space
@whity are you currently authoring any 3D eyewear experiences?
Marty Markenson
Vuforia Studio Product Manager
- Mark as New
- Bookmark
- Subscribe
- Mute
- Subscribe to RSS Feed
- Permalink
- Notify Moderator
Hi Marty,
Thanks for your reply. I think this is will be a really helpful thing. In previous experiences I tried billboarding of labels and having a colored square in behind. Unfortunately the square will come before the text when you change your point of view. This possibly will be solved with the 3D container.
Currently I am both working on eyewear experiences and on tablet solutions.
Regards
Whity
- Mark as New
- Bookmark
- Subscribe
- Mute
- Subscribe to RSS Feed
- Permalink
- Notify Moderator
Hi, @whity
I have no HMD for testing, but this works on my mobile device.
- A 3D sphere model
- A 3D Gauge or Image or Label placed at the center of the sphere, check Billboard and Always on top

Does this fit you need?
regards,
ClarK
- Mark as New
- Bookmark
- Subscribe
- Mute
- Subscribe to RSS Feed
- Permalink
- Notify Moderator
Hi @dsgnrClarK ,
that gif looks pretty neat. I think I described the problem wrong.
It is difficult to have several text lines in front of card board.
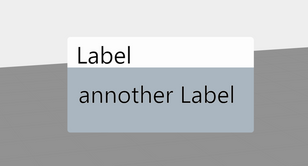
When aligning it looks like this:
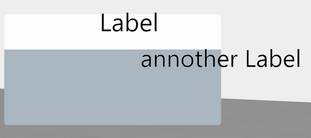
But after activating billboarding & always on top and changin the perspective, it looks like this:
But I think the 3D-Container should solve the problem.
- Mark as New
- Bookmark
- Subscribe
- Mute
- Subscribe to RSS Feed
- Permalink
- Notify Moderator
3D-container is on its way.
Meanwhile, something extraordinary mentioned by @sdidier worth a try.

Nevertheless, 3D SVG Widget is not visible in Vuforia Studio Canvas, difficult to manipulate (size, location).
Also, the SVG Codes is only accessible by text editor, not very convenient.
And, even if 3D-Container is available, 3DLabel won't wrap text still.
So I suppose 3D SVG Widget would be a better solution, if SVG Codes could be controlled by JavaScript in View.js. (Maybe this is only limited by my skill...)
- Mark as New
- Bookmark
- Subscribe
- Mute
- Subscribe to RSS Feed
- Permalink
- Notify Moderator
For everyone having problems with displaying many lines of information in one panel i can recommend the use of the 2D Canvas as it helped me alot in my experiences.
Some Code Snippet to try out yourself:
Just put some new 3D image on the Canvas and a Button and use the Buttons Click Event with this:
createInfoPanel('3DImage-1',"PanelHeader",4,{"Temp. Set Value in C°":"25","Temp. Act Value in C°":"24","Roller rpm":"200","Roller Distance in m":"2"});
----------------------------------------------------------------------------------------------------------------------------------------------------------------------------------------------------------
// $scope, $element, $attrs, $injector, $sce, $timeout, $http, $ionicPopup, and $ionicPopover services are available
//createInfoPanel('3DImage-1',"PanelHeader",4,{"Temp. Set Value in C°":"25","Temp. Act Value in C°":"24","Roller rpm":"200","Roller Distance in m":"2"});
$scope.createInfoPanel = function(widget/*STRING WidgetName*/, headertext/*STRING PanelName*/, itemnumber/*Integer Rows to show*/, daten/*JSON*/) {
//Parameter
var bodyHeight = 80 * itemnumber;
var keys = Object.keys(daten);
//Longest String
let allwordlength = [];
for(let i = 0;i<itemnumber;i++){
allwordlength[i]= keys[i].length;
}
let maxnum = Math.max(...allwordlength);
//Constructor
var windowHeight = 1024;
var windowWidth = maxnum > 30 ? 1024 :(maxnum > 25 ? 950 : (maxnum > 20 ? 900 : (maxnum > 17 ? 875 : (maxnum > 16 ? 850 : (maxnum > 10 ? 750 : 700)))));
var headerHeight = 180;
var headerWidth = windowWidth - 80;
var bodyWidth = headerWidth-80;
var borderWidth = 14;
var offset = borderWidth / 2;
//Canvas Start
var canvas = document.createElement("canvas");
canvas.height = windowHeight;
canvas.width = windowWidth;
var ctx = canvas.getContext("2d");
// Color Palette
var bg_orange = "rgba(249, 180, 45, 1)";
// Gradients
var grdorange = ctx.createLinearGradient(0, 0, windowWidth, 0);
grdorange.addColorStop(0, bg_orange);
grdorange.addColorStop(1, "white");
//Header Background Border
ctx.fillStyle = "black";
ctx.beginPath();
ctx.moveTo(0, 0);
ctx.lineTo(headerWidth, 0);
ctx.lineTo(headerWidth, headerHeight - 80);
ctx.lineTo(headerWidth - 80, headerHeight);
ctx.lineTo(0, headerHeight);
ctx.lineTo(0, 0);
ctx.closePath();
ctx.fill();
//Header Background
ctx.fillStyle = grdorange;
ctx.beginPath();
ctx.moveTo(0 + borderWidth, 0 + borderWidth);
ctx.lineTo(headerWidth - borderWidth, 0 + borderWidth);
ctx.lineTo(headerWidth - borderWidth, headerHeight - 80 - offset);
ctx.lineTo(headerWidth - 80 - offset, headerHeight - borderWidth);
ctx.lineTo(0 + borderWidth, headerHeight - borderWidth);
ctx.lineTo(0 + borderWidth, 0 + borderWidth);
ctx.closePath();
ctx.fill();
//Header Text
ctx.font = "bold 70px Arial"
ctx.fillStyle = "white";
ctx.textAlign = "left";
ctx.shadowColor = "black";
ctx.shadowBlur = 7;
ctx.fillText(headertext, headerWidth / 16, (headerHeight + 2 * borderWidth) / 2 + 10);
ctx.shadowColor = "transparent";
//Body Background Border
ctx.translate(0, headerHeight);
ctx.fillStyle = "black";
ctx.beginPath();
ctx.moveTo(0, 0);
ctx.lineTo(bodyWidth, 0);
ctx.lineTo(bodyWidth, bodyHeight - 80);
ctx.lineTo(bodyWidth - 80, bodyHeight);
ctx.lineTo(80, bodyHeight);
ctx.lineTo(0, bodyHeight - 80);
ctx.lineTo(0, 0);
ctx.closePath();
ctx.fill();
//Body Background "See Through"
ctx.fillStyle ="#69A2FF";
ctx.globalCompositeOperation = "xor";
ctx.beginPath();
ctx.moveTo(0 + borderWidth, 0);
ctx.lineTo(bodyWidth - borderWidth, 0);
ctx.lineTo(bodyWidth - borderWidth, bodyHeight - 80 - offset);
ctx.lineTo(bodyWidth - 80 - offset, bodyHeight - borderWidth);
ctx.lineTo(80 + offset, bodyHeight - borderWidth);
ctx.lineTo(0 + borderWidth, bodyHeight - 80 - offset);
ctx.lineTo(0 + borderWidth, 0 + borderWidth / 2);
ctx.closePath();
ctx.fill();
//Body Background
ctx.fillStyle = "rgba(105,162,255,0.8)";//Blue
ctx.beginPath();
ctx.moveTo(0 + borderWidth, 0);
ctx.lineTo(bodyWidth - borderWidth, 0);
ctx.lineTo(bodyWidth - borderWidth, bodyHeight - 80 - offset);
ctx.lineTo(bodyWidth - 80 - offset, bodyHeight - borderWidth);
ctx.lineTo(80 + offset, bodyHeight - borderWidth);
ctx.lineTo(0 + borderWidth, bodyHeight - 80 - offset);
ctx.lineTo(0 + borderWidth, 0 + borderWidth / 2);
ctx.closePath();
ctx.fill();
//Body Text Constructor
ctx.globalCompositeOperation = "source-over";
ctx.shadowBlur = 7;
let fontweight = maxnum > 30 ? 38 : (maxnum > 20 ? 42 : (maxnum > 15 ? 46 : (maxnum > 10 ? 48 : 50)));
let margin = maxnum > 30 ? 50 :(maxnum > 25 ? 60 : (maxnum > 20 ? 70 : (maxnum > 15 ? 80 : (maxnum > 10 ? 90 : 100))));
ctx.font = "bold "+fontweight+"px Arial";
ctx.fillStyle = "rgba(255,255,255,1)";
ctx.shadowColor = "black";
//Body Text
for (let i = 1; i <= itemnumber; i++) {
//Data Names
ctx.textAlign = "left";
ctx.fillText(keys[i-1] + ": ", margin, bodyHeight * i / (itemnumber + 1));
//Data Values
ctx.textAlign = "right";
ctx.fillText(daten[keys[i-1]], bodyWidth-margin, bodyHeight * i / (itemnumber + 1));
}
ctx.shadowColor = "transparent";
ctx.translate(0, -headerHeight);
tml3dRenderer.setTexture(widget,canvas.toDataURL());
}
------------------------------------------------------------------------------------------------------------------------------------------------------------------------------------
Final Look:
- Mark as New
- Bookmark
- Subscribe
- Mute
- Subscribe to RSS Feed
- Permalink
- Notify Moderator
the trick here is not to use multple objects, as the composition will never work as you thin (and this is true in the 3d example posted here - you can see the labels from one sphere overlapping another) so the trick is to combine the label and the backplate image into a single entity.
the tml sensor (which is what the gauges are built from) supports this - you can mix image and text content onto a single entity. The gauge widget provides the necessary fields - resource (the image) and text - so you don't need to understand tml to get the basics working. Take one of the 3d gauges and experiment with changes to the settings...
.
- Mark as New
- Bookmark
- Subscribe
- Mute
- Subscribe to RSS Feed
- Permalink
- Notify Moderator
@tmccombie thank you, we're already using it and it's good.
As a side note, we find it somehow clanky. You need to turn the head like 90° before it starts moving and then it follows quite nicely.
It would be definitely good if the dead zone could be easily edited in the properties of the widget.
There is a discussion on how to edit this by Javascript but it's quite complex.
Also would be nice to set a default position in the view field, like not always in the center (if not pinned) but i.e. top-right, bottom-left, etc... During long procedures might be a good thing to have it always moving if not centered.
I think this widget will be heavily used in almost any experience so this is, in my opinion of course, something many many users are looking forward to.
Thanks in advance for any consideration, keep up the good work.
Best regards
- Mark as New
- Bookmark
- Subscribe
- Mute
- Subscribe to RSS Feed
- Permalink
- Notify Moderator
You can set the horizontal offset using the "Offset X" property - simple way to do it is to create an app parameter, assign the x offset value (in meters) and then bind this parameter to the panel. OffsetZ specifies the distance away from the user (depth). The default for Z is 0.6m, a nice comfortable arm's reach (to press buttons etc.). The X offset default is 0, so yes it's right in front of you. Change the value if you want it to park to the side a little.
- Mark as New
- Bookmark
- Subscribe
- Mute
- Subscribe to RSS Feed
- Permalink
- Notify Moderator
That's great! Thanks @SteveGhee for the tip. I actually didn't know that by app parameters there were other properties that could be edited.
Is there somewhere a list of all the properties for the various widgets?
Btw I'll try woring to find a nice offsetX, probably 10 cm /15 cm is just enough.
- Mark as New
- Bookmark
- Subscribe
- Mute
- Subscribe to RSS Feed
- Permalink
- Notify Moderator
Studio Help Center has _most_ of the peropties listed / documented, but there are a few extras (like these offsets etc.) which are not exposed on the primary UI panel, mainly to reduce complexity. Easiest way to find them is to use the trick of binding an app parameter to a widget and seeing what comes up in the dialog 🙂


