1-Visitor
January 25, 2012
Solved

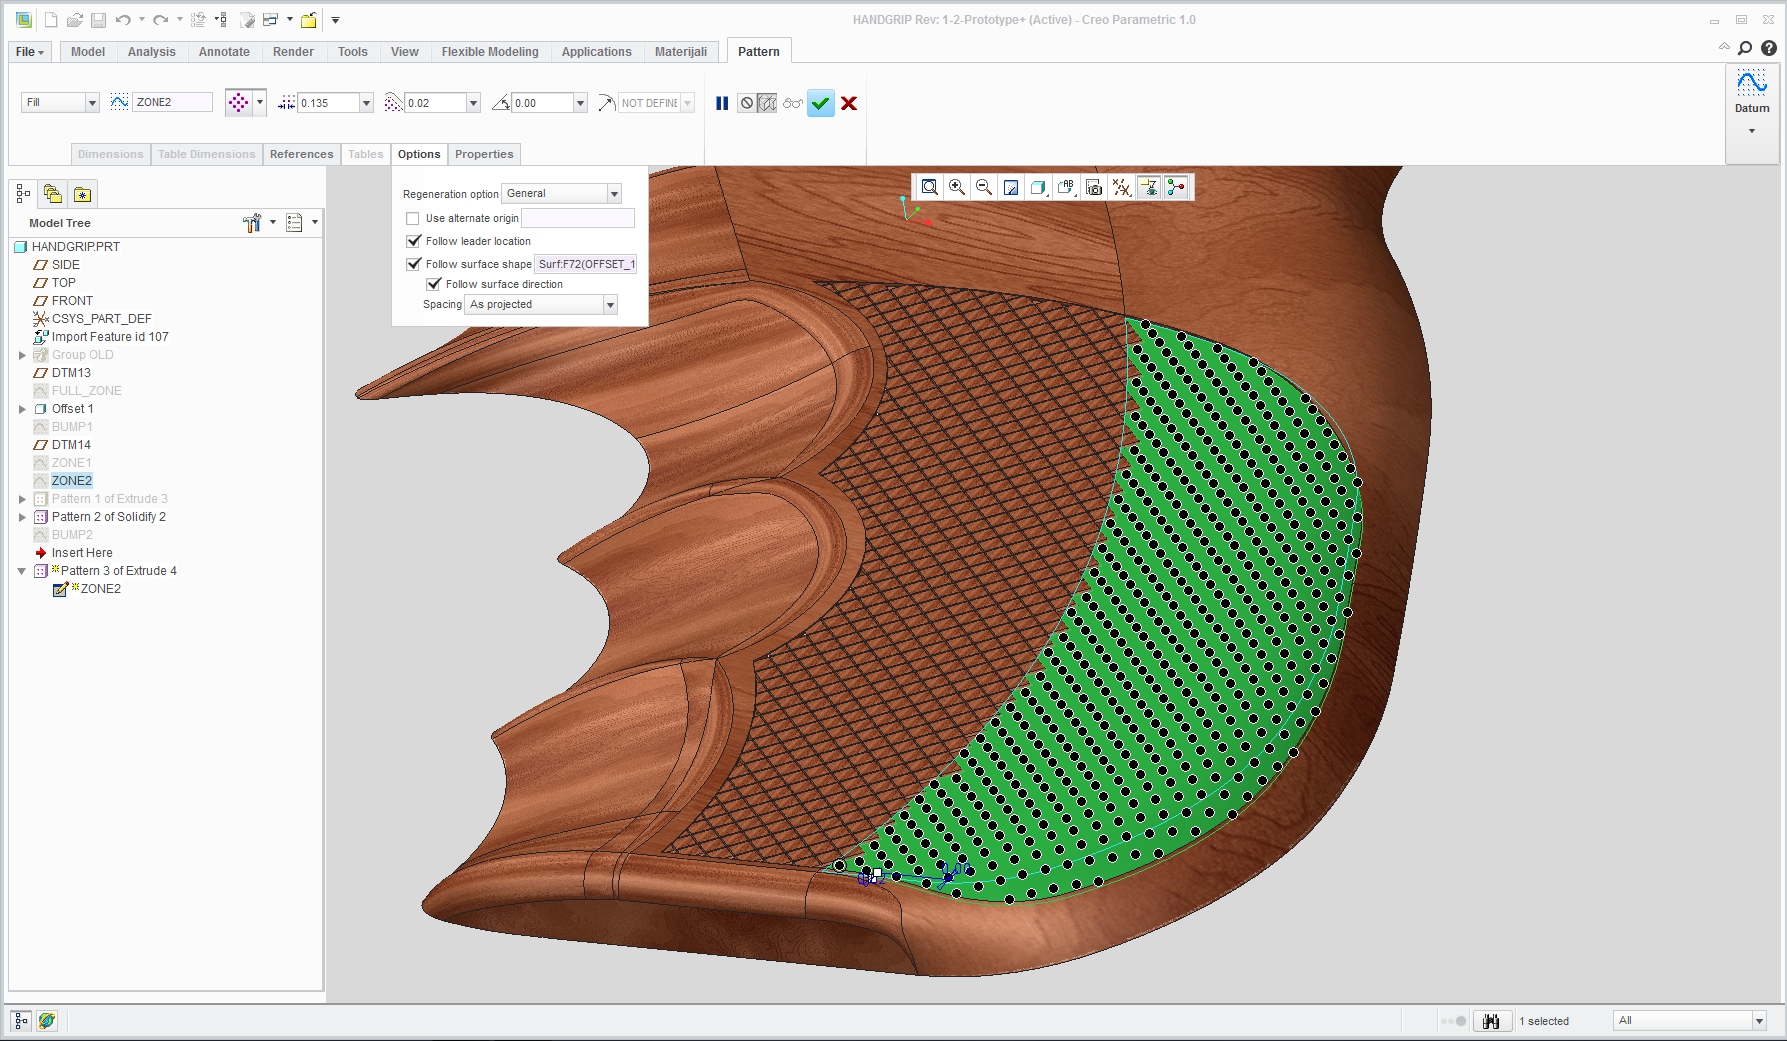
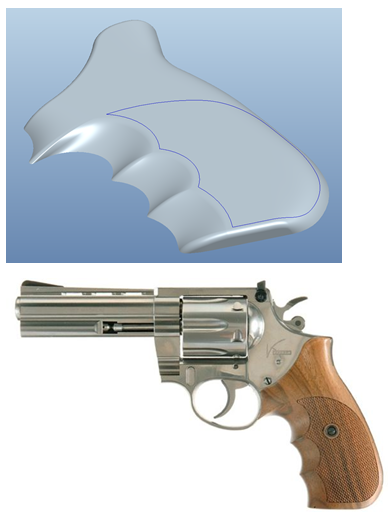
How can I "pattern" on this curved surface?

  • January 25, 2012
  • 2 replies
  • 10525 views

How would I model the portion of the handgrip that would be inside the blue curve? Pattern is in quotations in the subject line because your suggestion does not have to involve an actual Pro/E pattern. Just explain how you would accomplish this, but I don't want to use a textured image. I want to explore the solid modeling options.

I'm using Creo Elements/pro 5.0 with ProE/Foundation Advanced

Details:

This is just for learning and fun. I created the surfaces and had to stop because I don't know how to get the texture on there. I don't know the shape of the individual pieces that make up the texture, but I think its a 4-sided pyramid. Make the shape be whatever makes your solution possible.

Goals:

1. The patterned entitites should have no space between them.

2. The entities should have a constant height as measured from the curved surface.

3. Try to make the entities terminate at the blue curve, not before or after.

* The .prt file is attached.

grip-pattern.PNG

Have fun and teach me and the other readers a few things.

Regards,

Kevin


This thread is inactive and closed by the PTC Community Management Team. If you would like to provide a reply and re-open this thread, please notify the moderator and reference the thread. You may also use "Start a topic" button to ask a new question. Please be sure to include what version of the PTC product you are using so another community member knowledgeable about your version may be able to assist.
Best answer by DavorGranic

Here is screenshot of dashboard. Here i made pattern with no gap between entities.

Its basicly 2 patterns. I had to pattern extrudes that are surfaces not solids, solidify and then reference pattern of solidify feature. This is because there are problems when entities are patterned next to each other on curved surface, they tend create errors with geometry.

Diamond shape is basicly extrude with taper.

Sorry for late response.

2.jpg

2 replies

Patriot_1776
22-Sapphire II
January 25, 2012

So, you're lucky enough to work for a firearms company? Nice! I talked to a recruiter about a position with one once, the HR lady asked if I had any "ethical" reason not to work there. I told her "hell no", that I'd be proud to.

Are you looking for a snandard "diamond"-type knurl? Usually, you don't put that geometry into the model, it's simply photo-etched into the mold. The easiest way would be to create a bump map, and make it a visual and not geometry thing.

But.......making it real geometry would be that much more fun, right? I'll have to look at it when I get some time.

1-Visitor
January 25, 2012

Yeah, a knurl seems right. I don't have the gun in hand.

Yeah, I work for one, but they don't deal much in pistols and I'm not doing any design work here .

I didn't know about the photo-etching--thanks for that. I figured modeling the thing must be possible since it exists, but it makes much more sense for it to be a machining process.

I was using Creo 1.0 and different licensces a few months ago and I seem to remember there being a option within the pattern tool to pattern across a non-flat surface. But, I don't have those tools and want to find out if it can be done with my current software because like you said, It'll be fun!

16-Pearl
January 25, 2012

Kevin, i found your request quite challenging.

"1. The patterned entitites should have no space between them."

Unless there is a V or U groove between entities you will get nice big surface from merged little ones.

And there lies the problem i have, overlaping entities that create havoc. I used fill pattern projected on surface.

Your surface that you wana fill with entities is actualy made of 2 parts, one flat and one curved.

I tried patterning diamond shaped surface not solid and then solidifying it and pattering that but that gave me slightly better result.

Maybe solution lies in patterning groove section instead of diamonds.

BUTTERFLYgun_1.jpg


1-Visitor
January 26, 2012

I like your image. Its better than I could make. I'm bit confused about your explanation, though. Could you restate it and add more detail, possibly some screen shots of the menus? Specifically, what did you mean by "fill pattern projected on surface"?

Thank you,

Kevin

1-Visitor
January 26, 2012

hi,

I think Davor has used this technique: http://learningexchange.ptc.com/tutorial/778/using-the-fill-pattern-tool

(at the end of the vid)

Not sure how he got the triangular shape or diamond shape.