cancel
Showing results for 
Search instead for 
Did you mean: 
cancel
Showing results for 
Search instead for 
Did you mean: 

Community Tip - Learn all about the Community Ranking System, a fun gamification element of the PTC Community. X

Geometric tolerance drawing

SR_CAD
13-Aquamarine

Geometric tolerance drawing

Hi,

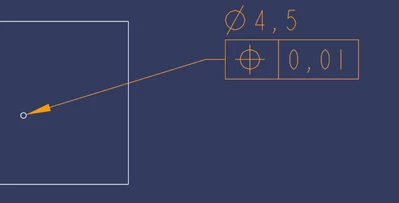
By defauft, when I add a geometric tolerance, it looks like this : 
LearningProcess_0-1682611488906.png


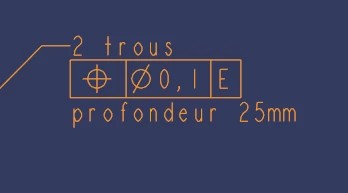
How can I change where the line starts ? For example, like this :
LearningProcess_1-1682611532269.png


Thanks in advance.

4 REPLIES 4
KenFarley
21-Topaz I
(To:SR_CAD)

The simple answer seems to be that the first tolerance was placed by picking a geometric entity, much like a dimension is placed.

The second is almost like what happens if a geometric tolerance is placed by picking on a dimension. The part that's not what I usually see is the text after the tolerance. The "profondeur 25mm". Normal behavior when attaching a tolerance to a dimension, as far as I know, is the tolerance always is the last line of the dimension.

This leads me to suspect that the tolerance shown in the second image is what I call a false tolerance. It is just text typed in using formatting tricks to make it look like a legitimate tolerance, but it is not. You make up the different components of the "tolerance" by putting text in boxes. I don't know why people do this type of thing, because it is much easier to just use a legitimate tolerance, especially since your datum references (the "E", here) will be to actual datums, not just dumb text you typed in.

SR_CAD
13-Aquamarine
(To:KenFarley)

Hi, the second screen was indeed confusing, to be more precise, if I come back to the first screen, I would like to have the line like this after having placed a geometric tolerance :

LearningProcess_0-1683231616828.png

I used the same thing as in this video : https://youtu.be/9D9h7xeE4LE?t=1225 (Annotate / Geometric tolerance).

KenFarley
21-Topaz I
(To:SR_CAD)

I don't know what settings you have or what you are actually clicking on in the process of creating this, but the only way I've ever seen a geometric tolerance applied to a dimension is that the leader arrow goes to the "dimension part", and the geometric tolerance is the last line of the dimension. The arrow, no matter how many lines are in the dimension text, always goes to the first line of the dimension text.

In case it's not clear, to add a geometric tolerance to a dimension, I use Annotate->Geometric Tolerance, then select the dimension, not any geometric reference. This appends the geometric tolerance to the dimension, no leader arrow, just the tolerance box with its contents.

SR_CAD
13-Aquamarine
(To:KenFarley)

I also use Annotate -> Geometric Tolerance -> Select the dimension but the arrow goes to the geometric tolerance. It's probably a setting but I don't know which one.

Announcements
NEW Creo+ Topics: Real-time Collaboration


Top Tags