Community Tip - Have a PTC product question you need answered fast? Chances are someone has asked it before. Learn about the community search. X
A question a colleague asked which I can't answer - but hopefully someone here knows. This is from an old drawing done in AutoCAD (from 2009 :)) We are trying to find out what the designer (who long since left) meant by this:
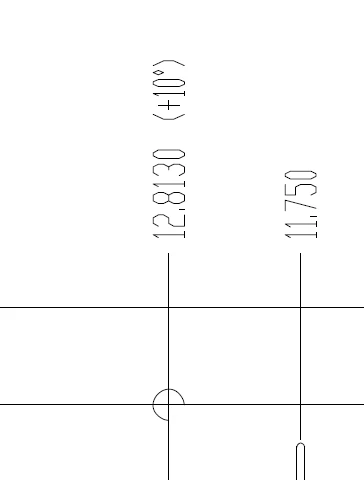
Units are in inches, and ordinate dimensioning scheme is used.
What does the +10° mean ?
Solved! Go to Solution.
I've seen dimension like this indicate draft on a molded part. In other words, this dimension is the smallest that feature is and the draft is 10 degrees.
Thanks Doug! That makes sense in our situation. Although this is a machined part... Just to follow up - this would be well understood by machine shops, or would you avoid such a callout?
For molded parts, the standard now is to go off the CAD data. The drawing only has critical to fit and inspection dims, so this note wouldn't be used now. I'm not sure it was very common in the first place, and I don't think I've ever seen it on a machined part.
If your machine shop is working off the drawing rather than the 3D data, you'd need a way to describe the entire part. Personally, I never liked this way of calling out draft, I'd cut a section and add the angle dim there. Of course, depending on the complexity of your part this could get complicated and time consuming. I'm not sure how well understood this method is outside of the mold making world. I also have no idea if it conforms to any standards.
ASME Y14.8 is the standard that shows it's usage. It also states that it shouldn't be used on features critical to function. For features critical to function you should use geometric controls.
Likely the other suggestions are correct, but I've also seen this type of dimension when the part being defined is going to be formed as a final operation into a cylindrical shape. A hole is specified in the "flat pattern" with a linear dimension for the machining operation, but gives the ultimate angle of the same hole in the "bent" part.
I don't really like this kind of thing because the angle is usually not calculated by the program, but just typed in text by the person making the drawing, and thus doesn't automatically update if the hole location is changed, etc.