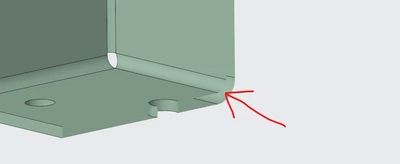
cancel
Showing results for 
Search instead for 
Did you mean: 
cancel
Showing results for 
Search instead for 
Did you mean: 

Community Tip - Your Friends List is a way to easily have access to the community members that you interact with the most! X

Offset section leads to 'hollow' parts (BUG?)

Nairn
10-Marble

Offset section leads to 'hollow' parts (BUG?)

Hello everyone, I have encountered what I think is a larger problem with the Creo system (though hopefully I am just missing something obvious?)


I have been through a few similar posts on here (e.g. https://community.ptc.com/t5/Creo-Modeling-Questions/Solids-are-shown-as-a-shell-when-section-view-is-activated-on/td-p/98297) but have not been able to find a solution which solves my problem.


This relates to creating an offset section of a sheetmetal part which intersects an extrude, and only extending the section in one orientation from the plane.

NC_10083041_0-1661354532444.png


As far as I can tell, this is 100% repeatable, though I haven't been able to test on many parts. The setup for this is to take a sheetmetal part, create an extrude, then create an offset section using a reference plane as the basis of the sketch. Below is a part I can produce the problem on:
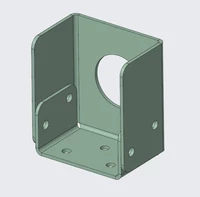
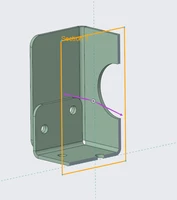
 

NC_10083041_1-1661350163511.png

NC_10083041_4-1661350527759.png Part looks okay while in the Edit Definition screen of the section, with a gray color on the intersected faces.


Once I create an offset section of the part it looks like this:
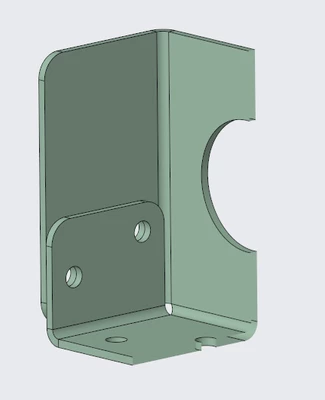
 

NC_10083041_2-1661350237351.pngNC_10083041_3-1661350333891.png

Note the visibility of the inner surfaces, as the end which is cut by the section now isn't capped. (I have checked Capped_clip config setting, which is set to YES)


When clicking the 'show hatching' button, the display does not change.


It seems like Creo thinks the part isn't a valid cap as a result of the section.

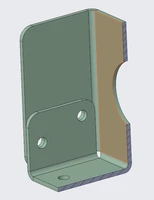
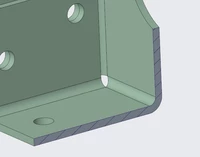
Creating a planar section and offsetting it to the same area gives the following result, however, which is why I believe this is an issue relating to the offset section:
 

NC_10083041_5-1661350898836.png

NC_10083041_6-1661350945069.png

The part is properly capped, and the hatching is visible on the whole length of the cap.


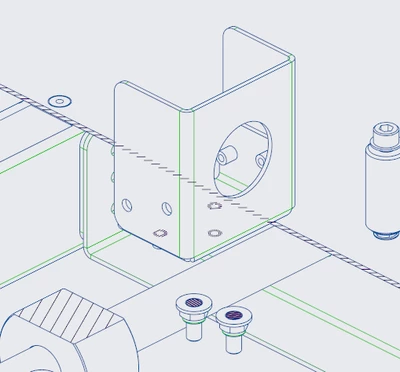
While I could use a planar section to solve the above pictured problem, and end up with a properly sectioned part, the issue I was originally facing was in the assembly in which I am using these parts, specifically the drawing:
 

NC_10083041_7-1661351078778.png

This is very peculiar, and another reason I am led to believe this may be a bug rather than a feature/option I have missed.


The part is shown in full, not in section; but stranger is that section markings from objects behind are being shown through the part, as if the part SHOULD be sectioned, but isn't for some reason.


Unfortunately I need to use an offset section in this case to show specific parts of the full assembly, so cannot simply switch to a planar section, which would be the easy option.


This seems to be the only component in the 1000+ parts assembly which is experiencing this problem, but I don't know what makes this component special. I have checked there are no interferences with the part, the part is fully constrained, and was placed as part of a pattern (using the reference placement option) but the other components in the pattern are all hidden correctly as a result of the section. The difference with the pattern is that this instance is intersected by the section, rather than being fully consumed; but the base upon which this component sits is perfectly fine, and it is also intersected by the plane of the offset section. If I move the plane which the section is set on, the same error is occurring with the other identical components in the pattern, so it seems to be something to do with this part specifically, but as far as I can tell not due to the fact it's part of a pattern, as other patterned objects are problem free.


If anyone has any advice, things to try, similar experience I would love to hear it. If anyone would be able to test some of their own parts to find out if it's just my creo install, my specific part, or if there is something else going on, that would be much appreciated.


I will be on holiday from tomorrow (25th Aug), returning on the 31st, so I won't be able to respond to or test any replies until then, but I look forward to any information anyone can provide. I will submit this as a bug with PTC support upon my return if I cannot find a solution here.


Thank you for reading!


EDIT:

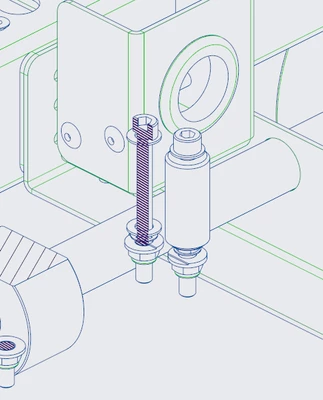
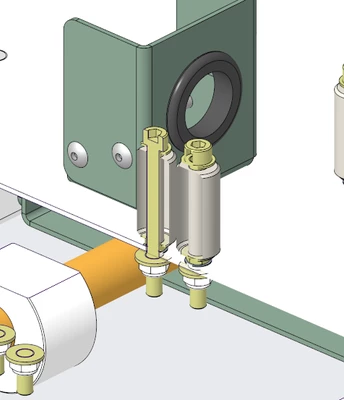
Quick edit just after posting this I tried to move the reference plane the problem part wasn't intersected, and discovered the same bug in a solid-body part, so this is not sheet-metal exclusive!
 

NC_10083041_0-1661352778010.png

NC_10083041_1-1661352810610.png


There is even a total difference between the model and the drawing views, with one completely omitting the white roller component, and the other being shown as complete and un-sectioned, despite both being intersected by the same plane and therefore the same offset section operation. Something strange is definitely afoot!


Edit 2:

I have noticed an error message which is sending continually whenever the Creo window is active and I hover my mouse over the drawing view. I will investigate this further when I get back next week, but potentially this is unrelated to the section display problem, as when I noticed this error appearing it came with a host of other display issues in the drawing view.


NC_10083041_0-1661355172374.png


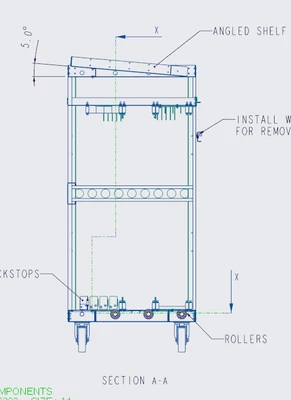
I also thought it would be important to include the shape of the section, in case I am using it in an unsupported way (though even the simpler tests I did on the single component in the model space had the same issues). The reason I cannot use a planar section is that I would like to show different depths of the assembly across it's height, as there is some shelving nearer the top which requires more of the model visible to read clearly, while I also want to cut away more of the base to reveal the structure underneath, all while giving the context of the back and side of the assembly. If this is the cause of the issue and simply an unintended use-case I could try and find an alternative way to display the information, however the fact the iso view is so close to accurate makes me think this isn't meant to be an unsupported use of the section tool.
 

NC_10083041_1-1661355341057.png


7 REPLIES 7
TomU
23-Emerald IV
(To:Nairn)

Do you have any other systems you can check this on?  Preferably one with a different graphics card?  You've done a really good job documenting the problem.  I'd suggest sending this same information and the CAD files off to tech support at PTC and see what they have to say about it.

Nairn
10-Marble
(To:TomU)

Thanks Tom! Unfortunately I don't at the moment, I'm hoping someone will be willing to check this out for me on their own systems and submit their findings here as I only have the one PC around at the minute. I will attach some of my PC's specs when I get back from my holiday as I'm just about to clock out. I think you're right, I'll submit this to PTC and see if I can get any feedback. The more I am testing this the more it seems to be wholly inconsistent between parts, patterns, materials, positions, with no common thread I can find to link affected components, so I believe this is a bug.

Nairn
10-Marble
(To:Nairn)

One addendum I have to make:

The drawing view option "Hidden line removal for xhatches" does effectively hide the line which are displaying above/through the erroneous part, but the part itself if still displayed incorrectly, not properly sectioned.


NC_10083041_0-1661354655843.png

NC_10083041_1-1661355010643.png


StephenW
23-Emerald III
(To:Nairn)

A couple of things I see:

Offset x-section and surface models don't play well together, so if you have surface models, you may never get it to works like you want. On a planar section, you can "include quilts" which will do a good job of cutting the surface model correctly for a drawing, but on Offset section, there is no option for including quilts, so they will not properly section in a drawing.

Your error looks like an older error I have seen "x-section aborted in view X" and wouldn't show up at all. I could usually fix that by moving the section cut plane just a little bit (if acceptable, sometimes you can't due to dimensions or visibility.


(sorry for the blur in some images, some geometry is standard, some is propietary)


StephenW_3-1661357965152.png


StephenW_1-1661357937423.png

StephenW_2-1661357945082.png


Nairn
10-Marble
(To:Nairn)

I believe I have gotten very close now to the exact cause of the issue: This issue is arising when a part is sectioned through a pair of extrusion cuts, and the orientation of the section is limited to one direction.


The below screenshot is what led me to conclude the real culprit here. The part below is the very same one used in the bulk of my post above. The altered cross-section set-up is not creating any issues with this bracket. In-fact, the section runs directly through one of the part's through-holes without issue. This proves the underlying data of the PART is not to blame, but how the section interacts with the model's geometry.


Nairn_0-1661948328303.png

The difference with this particular configuration of the section, is that this particular component does not lie on the original plane of the section, and these capped sections are a result of the x-sections EXTRUSION rather than it's ORIGIN.


I will explain this in detail below.


This screenshot shows the setup of the offset section which allows me to create the effect of cutting a chunk out of the assembly (as if dragging out a cube which has been constrained to one corner of the model), which is limited in every planar direction (to maintain geometry on the left, back, and bottom of the assembly to provide context):


Nairn_7-1661952893196.png

Nairn_4-1661952534943.png

The crude dotted red line shows the plane on which the section is based.


Combining the position of this plane and the orientation controls:

Nairn_5-1661952654936.png


I control the 'extrusion' of the section, and in this case, limit the section's depth by selecting the 'none' option.


Further testing

Note in the two images below of a test file, the orientation of the planes upon which the offset sections are based, and where the problem faces lie (the purple arrow illustrates the behavior of the section; based on the shown plane, one side extends and removes a portion of geometry, but the other direction with the dotted arrow is where the orientation controls are preventing the section 'extruding'). The sections are set up in the same way as my original assembly, with the orientation option set to only allow one direction of the section from the origin plane. When the plane creates a new 'surface' which sits between two holes the surface is un-capped, however the exact same holes have no problems displaying when the alternate section is shown, which uses a perpendicular plane to the first. In the cases where the 'extrusion' of the section creates a surface between two holes (in the picture with the purple arrow, the holes on the left by the flange are the result of the section's extrusion) the program has no problem generating the caps.


Nairn_12-1661954622679.png

Nairn_0-1661955001917.png


I have a call with PTC scheduled for tomorrow morning, in which I will discuss this issue and the new cause I have outlined here. Hopefully this can be resolved for future releases, as this is a very annoying problem in large assemblies, where there may not be the option to re-route the offset plane to avoid holes, or use a planar section.


StephenW
23-Emerald III
(To:Nairn)

I was able to re-create the issue in Creo 4 M130, just FYI.

I've never used the orientation controls so that is likely why I haven't seen this specific issue.


Good luck getting resolution!


StephenW_0-1661958641755.png


StephenW_1-1661958649277.png


Nairn
10-Marble
(To:StephenW)

Thank you for taking the time to test this for me, I really appreciate it.

I have passed this thread on to PTC so hopefully they can get this fixed. 

Announcements
NEW Creo+ Topics: Real-time Collaboration


Top Tags