cancel
Showing results for 
Search instead for 
Did you mean: 
cancel
Showing results for 
Search instead for 
Did you mean: 

Community Tip - You can subscribe to a forum, label or individual post and receive email notifications when someone posts a new topic or reply. Learn more! X

differences between pro e 4.0 and 5.0 schools edition

SebastianH.
1-Visitor

differences between pro e 4.0 and 5.0 schools edition

Hi!

A week ago i installed the pro e 5.0 schools edition, and I was quite pleased with the new outfit, but when I got to the 2D drawing I found myself in some trouble...

I am using a german version, so it could happen that I do not use the terms which are used in an english version of pro e.

1) how to view axes? I think I once found the right button by accident, but since then, I didn't find it again...

2) when I insert a dimensioning the value is directly between the arrows. But i want to have it above the dimensioning line.

This is, what it looks like at the moment:
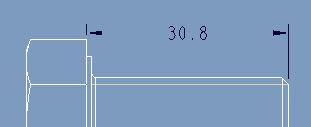
Unbenannt.JPG

And this is how I want to have it look like:

Unbenannt2.JPG

3) again dimensioning: this time I want to have the values turned around:

Make this:
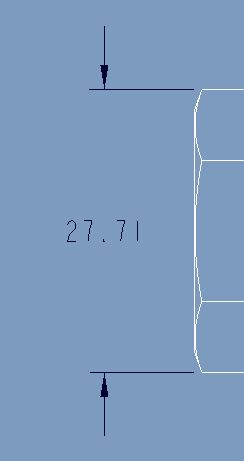
Unbenannt3.JPG

...looking like that:

Unbenannt4.JPG

4) Last but not least: how can I change my model from "shade" to "visible edges", "invisible edges" or "wire frame" (I guess i didn't use the right terms here, even I do hope you know what I mean)

Thanks for answering. In fact I really like pro engineer, but at the moment I'm kind of distressed with all that... and I guess there will be more problems with the 2D drawing...

Greetings, Sebastian

ACCEPTED SOLUTION

Accepted Solutions
Kevin
12-Amethyst
(To:SebastianH.)

1) To show axes, dimensions, etc. use the Show Model Annotations icon found on the Annotate tab. You need to then select the appropriate tab then depending on what you select, ie feature, view, etc., items will appear in the dialog box. As you move the cursor over the drawing items will highlight to show what will be selected if the left mouse button is pressed. To pick items you can select items in the main graphics area, views in the drawing tree, features in the Model Tree, or a combination of the three and items that can be shown will appear in the dialog box. If you erase items you need to find them and unhide them in the drawing tree. Erased items don't show in the Show Model Annotations dialog box, deleted and items that have not been shown do.

2) & 3) In the drawing options change the setting for text_orientation.

4) You need to select the layout tab. Select the view or views from the main graphics window or the drawing tree and right mouse click to find Properties.

View solution in original post

9 REPLIES 9
Kevin
12-Amethyst
(To:SebastianH.)

1) To show axes, dimensions, etc. use the Show Model Annotations icon found on the Annotate tab. You need to then select the appropriate tab then depending on what you select, ie feature, view, etc., items will appear in the dialog box. As you move the cursor over the drawing items will highlight to show what will be selected if the left mouse button is pressed. To pick items you can select items in the main graphics area, views in the drawing tree, features in the Model Tree, or a combination of the three and items that can be shown will appear in the dialog box. If you erase items you need to find them and unhide them in the drawing tree. Erased items don't show in the Show Model Annotations dialog box, deleted and items that have not been shown do.

2) & 3) In the drawing options change the setting for text_orientation.

4) You need to select the layout tab. Select the view or views from the main graphics window or the drawing tree and right mouse click to find Properties.

Thank you so much for helping me. I guess I will need some time to get into the new layout of Pro e 5. But for now: thank you!

Hi! Again me

And again a problem. I guess you can somehow edit a parameter to change the display of this, but i just don't find it.

This is how it looks like:

Unbenannt.JPG

As you see, the arrows marking the section are pointing into the wrong direction...

And here the one how I want it to look like:

Unbenannt1.JPG

Thanks for your answers!

Sebastian

Kevin
12-Amethyst
(To:SebastianH.)

In the Drawing Options change the setting for crossec_arrow_style.

Thanks for that. I'm kind of ashamed, that I didn't find that one... but now the arrows are in the rigth position, but they are pointing again in the wrong direktion:

Unbenannt.JPG

If i change the material removal side it looks like that (the lines in the right section disappeared...):

Unbenannt1.JPG

I think I tried every option, but didn't find the right one...

Kevin
12-Amethyst
(To:SebastianH.)

I think the arrows are okay I suspect the views were setup differently than you expected. Here are two other options you'll want to check. The first is projection_type. Based on the images you have shown for what you want you're using first angle projection, however, the views you are showing appear to be third angle projections. In other words the section view you have shown as a view on the right should be on the left (the section view you have shown is a right side view which for first angle projection is to the left of the view projected from). So if it's acceptable you could just move the view over to the left side or you need to create a projection view for the left side of the part.

The other option to check which will help you make sure your looking at the correct side of the section surface is under the view properties. Select your section view, right mouse click and select Properties, under View Display set Hidden line removal for xhatches to Yes. When you are looking at the correct side you will see the xhatch and if you choose flip the material direction with the view set to No Hidden display style the xhatch will disappear.

hmm.... I'm sorry, but that didn't work out.

I now tried to take my old "config.pro" data file from the old pro e-4.0 and copied it into the new one. and it worked! I'm sorry, that I didn't think of it before, but thank you so much for your help. At least i now know the thing with the hidden line removal. I was already searching for something like that.

Thanks again. I guess it hasn't been the last time for a problem to appear with Version 5.0...

Kevin
12-Amethyst
(To:SebastianH.)

Not sure what you mean by it didn't work. What was projection_style set to? Did my explanation of the veiws make sense or did I miss what you were after? Use caution though when copying config.pro or drawing.dtl files from one version to another since options get removed and added.

Everything was as you said, but after I changed the projection_type, I didn't see any changes. I don't know why. and even less i know why it works now... (now projection_type is set to first angle)

Thank you for the warning. For now it looks like everything is running normal. I hope this will stay like that^^

Announcements
Top Tags