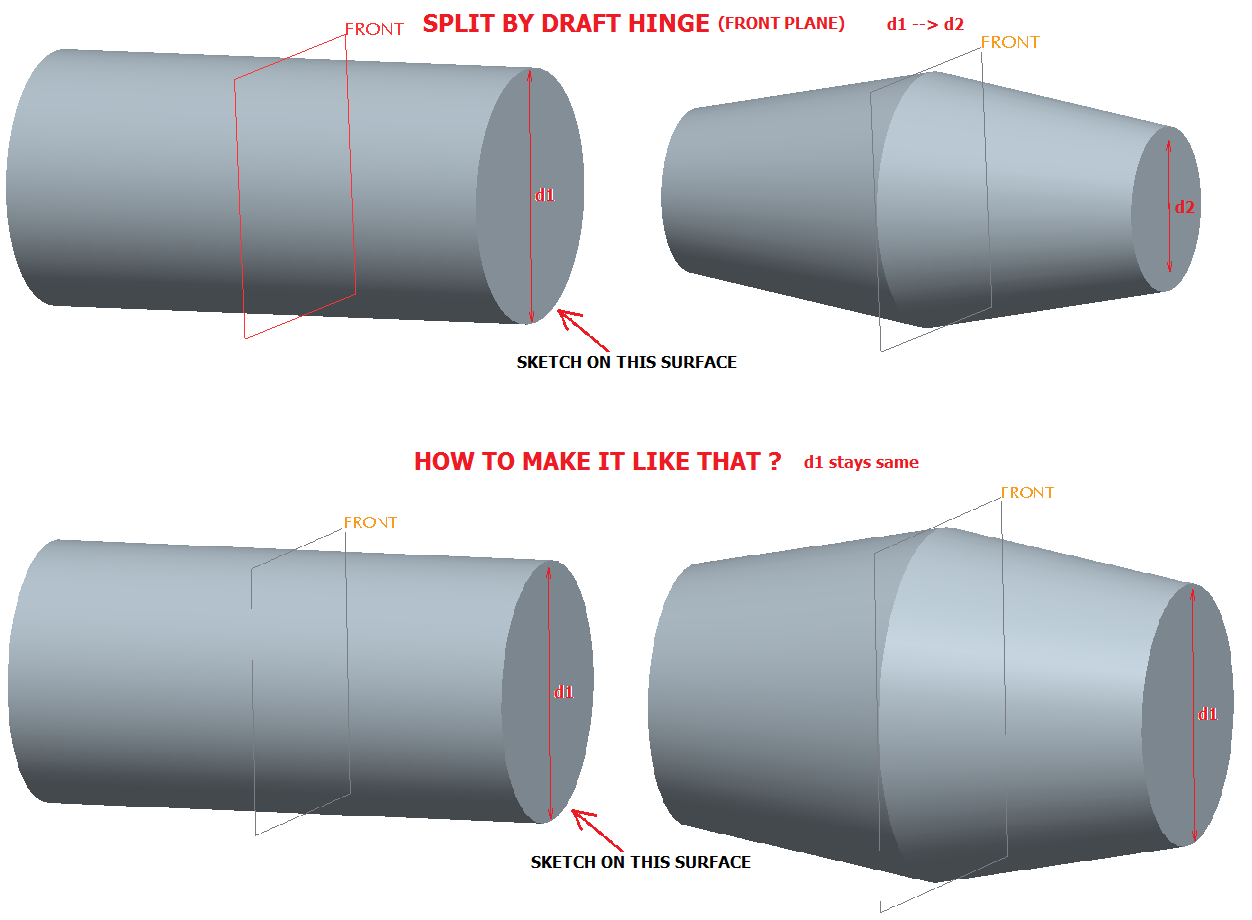
1-Visitor
January 30, 2014
Solved

Split Draft

  • January 30, 2014
  • 2 replies
  • 8210 views

Using Creo Elements/Pro 5.0 M210


Is there a way to make a draft like shown on picture ?


If i use front plane as draft hinge for splitting. My sketch diameter d1 changes as d2


I want to keep d1 diameter dimension fixed and draft until up to the front plane and then draft down to the d1.


split_draft.png


This thread is inactive and closed by the PTC Community Management Team. If you would like to provide a reply and re-open this thread, please notify the moderator and reference the thread. You may also use "Start a topic" button to ask a new question. Please be sure to include what version of the PTC product you are using so another community member knowledgeable about your version may be able to assist.
Best answer by rzukowski

Not sure about Creo Elements/Pro 5.0, but in Creo 2.0 you can:

1. Before selecting anything, go to the "SPLIT" tab and select "split by split object"

2. In the Split object box, "Define" to sketch a line that represents your split location

3. On the "References" tab, select the surface(s) you want to draft

4. In the Draft hinges box, select both top and bottom surfaces of the cylinder, using the CTRL key.

5. Set the pull direction.

6. Set the Side options to "Draft sides dependently"

Hope this helps.

2 replies

21-Topaz II
January 30, 2014

I think the easiest way to do that would be with a revolve. As you discovered, the draft hinge defines where the size of the drafted surfaces remains the same. I supsect that you're actual model isn't this simple, however.

I can come up with other alternative, but they'd be many more features.

rzukowski13-AquamarineAnswer
13-Aquamarine
January 30, 2014

Not sure about Creo Elements/Pro 5.0, but in Creo 2.0 you can:

1. Before selecting anything, go to the "SPLIT" tab and select "split by split object"

2. In the Split object box, "Define" to sketch a line that represents your split location

3. On the "References" tab, select the surface(s) you want to draft

4. In the Draft hinges box, select both top and bottom surfaces of the cylinder, using the CTRL key.

5. Set the pull direction.

6. Set the Side options to "Draft sides dependently"

Hope this helps.

21-Topaz II
January 30, 2014

You cannot select more than one draft hinge surface, I checked both WF4 & Creo 2.

You can use your method to draft one end at a time by selecting "draft first [or second, as appropriate] side only" and then drafting the other side in a separate feature. It's going to be hard to get the center to line up, if that's important, unless the cylinder is symmetric about the FRONT plane.

13-Aquamarine
January 30, 2014

Here are a couple parts that I tried, both Creo 2.0 and WF4.

draft_split.jpg