cancel
Showing results for 
Search instead for 
Did you mean: 
cancel
Showing results for 
Search instead for 
Did you mean: 

Community Tip - Stay updated on what is happening on the PTC Community by subscribing to PTC Community Announcements. X

Drawing table listing dimensions and its tolerances

MatthewV
8-Gravel

Drawing table listing dimensions and its tolerances

Hello !


I am using Creo 7.0.7.0


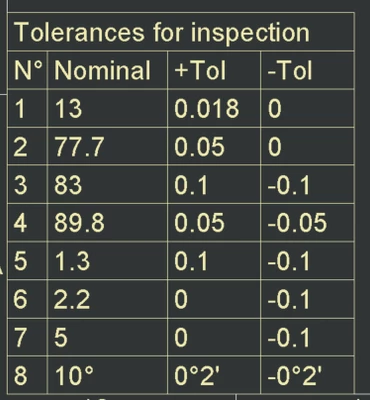
I am looking for a way to add a drawing table with specific dimensions for which we request inspection. I have manually made this table :

MatthewV_0-1718105255587.png

MatthewV_1-1718105281503.png

I am looking for a way to automatically fill this table : the idea would be to refer the dimensions that need to be inspected somewere and that it fills the table and extract the minimum tolerance and maximum tolerance. Also it would be great if this table would update as the dimension or tolerances are updated. 


Is there a way to do that with Creo maybe with a drawing table, parameters and a repeat region ?


Best regards,
MatthewV
7 REPLIES 7
Chris3
21-Topaz I
(To:MatthewV)

The only way to do this that I am aware of is a round about away. You can copy the tolerance into a parameter and then show that parameter on the drawing:

Capture.PNG

Capture2.PNG

Chris3
21-Topaz I
(To:Chris3)

This article says it isn't possible in a repeat region: CS98437


The idea for this has been archived (meaning it won't be implemented)

BenLoosli
23-Emerald II
(To:MatthewV)

This is one area where the parametric design of Creo is a hinderance.

When we used Unigraphics, we had a GRIP program that would gather all dimensions on a drawing and build a table showing the metric value with the converted english value. This was to allow the machine shop to use their existing measuring tools while engineering designed everything in metric. When we switched to Wildfire, we tried something similar, but when we grabbed a dimension for the table, it would give us the symbolic name and then error with a message that a dimension may not be used twice in the same drawing.

Hi,

I guess the only way is developing Toolkit application.


Martin Hanák

I saw that there is an option to mark dimensions for inspection (checkbox in display field of a dimension) is there a way maybe to use this to create this table ?  


Best regards,
MatthewV

Hello @MatthewV


It looks like you have some responses from some community members. If any of these replies helped you solve your question please mark the appropriate reply as the Accepted Solution. 

Of course, if you have more to share on your issue, please let the Community know so other community members can continue to help you.

Thanks,
Community Moderation Team.

StephenW
23-Emerald III
(To:MatthewV)

This post listed several 3rd party applications that will do that for you.

https://community.ptc.com/t5/3D-Part-Assembly-Design/SO-When-is-PTC-adding-inspection-numbers-Here-Lie-my-failures/m-p/752814#M121136

This question comes up on occasion. Seems there has been no progress on getting this functionality out of the box.

Announcements
NEW Creo+ Topics: Real-time Collaboration


Top Tags