

Mapkey Writing/Editing Tips
I've created several mapkeys lately so I thought I'd share some general tips I learned to write it down for next time. Please share your own tips below to expand the collection. 
This was done on Creo 3 M060 but the ideas should hopefully be not specific to that.
Mapkey Writing/Editing Tips
General Tips:
- Mapkeys often break when upgrading between Creo Versions (Creo 3 vs Creo 1) but they can save you a lot of time in the year or two between versions.
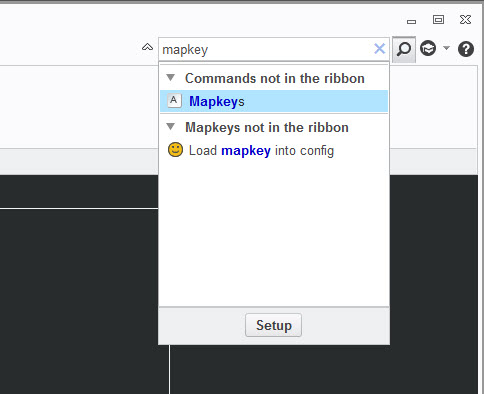
- Open the mapkey menu by searching for Mapkeys in the upper right. Also, if someone knows how find the Mapkey menu behind when its behind other Creo Windows, please share.
- Record commands from the RMB or the Quick Access Toolbar to eliminate extra Mapkey lines that just moves around Creo for no reason. Most commands can be launched without being on a specific interface tab.
- Mapkeys skip any commands they cannot execute. This lets users add in some logic to close menus that sometime popup or delete items if that would cause an error (e.g. view4dxf view gets deleted if it exists to always allow view4dxf view to get added without throwing an error).
- When editing mapkey text, always create a backup or copy of the original code so you can copy and paste back in as needed. I usually keep Notepad open to copy and paste code into before changing mapkeys.
- As far as I know, mapkeys cannot have comment lines except at the start and cannot have blank lines. Please share if someone has a way to do this.
- Mapkeys seem to have a minimum and maximum number of characters per line. I usually just visually compare to other mapkey lines to make sure it’ll work. Someone might know the exact limits.
- Every line except the last line of a mapkey needs to end with a \
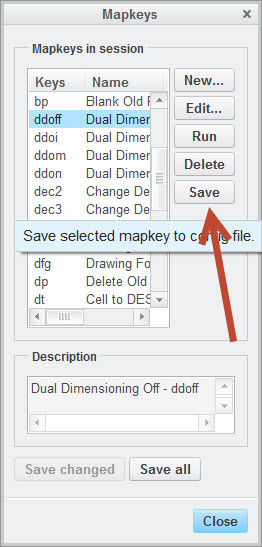
- I like to record mapkeys and then save just that specific mapkey as a text file to my desktop to copy into my actual config.pro. You can give it a relevant name to find it easier like pdf.pro. This will save only the mapkey you have selected into a text file.
Quickly Update Mapkeys in the Current Creo Session
THIS WAS MY BIGGEST DISCOVERY FOR MAPKEYS TESTING! Originally, I would update the config.pro text file and close Creo to update my mapkeys. However, you can just reimport the newly saved config.pro from within Creo so you don’t destroy your test setup. I wrote a mapkey to do that called UPMAP that uses my working directing config.pro. My working directory is in the C:\Users\Public\Documents location. Hopefully this works for you but I make no promises. Make sure to save your work before trying any new mapkeys.
mapkey upmap @MAPKEY_LABELUpdate Config.Pro - upmap;\
mapkey(continued) ~ Command `ProCmdRibbonOptionsDlg`;\
mapkey(continued) ~ Select `ribbon_options_dialog` `PageSwitcherPageList` 1 `ConfigLayout`;\
mapkey(continued) ~ Select `ribbon_options_dialog` `ConfigLayout.ImportExportBtn`;\
mapkey(continued) ~ Close `ribbon_options_dialog` `ConfigLayout.ImportExportBtn`;\
mapkey(continued) ~ Activate `ribbon_options_dialog` `ConfigLayout.Open`;\
mapkey(continued) ~ Trail `UI Desktop` `UI Desktop` `DLG_PREVIEW_POST` `file_open`;\
mapkey(continued) ~ Activate `file_open` `Current Dir`;\
mapkey(continued) ~ Select `file_open` `Ph_list.Filelist` 1 `config.pro`;\
mapkey(continued) ~ Command `ProFileSelPushOpen_Standard@context_dlg_open_cmd`;\
mapkey(continued) ~ Activate `ribbon_options_dialog` `OkPshBtn`;
Execute Multiple Mapkeys in one Mapkey:
I’ve only done this once so bear with me here with some help from James post linked below. This example calls >storetmp then >partnamesave followed by >loadconf mapkeys. Note the ~ is not required.
mapkey(continued) %>storetmpfile;%>partnamesave;%>loadconf;\
mapkey(continued) ~ Activate `ribbon_options_dialog` `CancelPshBtn`;\
How to create a drawing with same name as active model with Mapkeys
Getting Input from Users
Sometimes you need to get input from users before continuing. You can change how the mapkey records input, but I haven’t played with this too much.
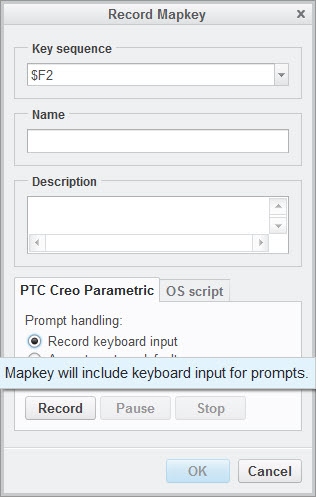
I usually just leave it at the default and add code in as needed. The two commands I know about are @MANUAL_PAUSE and @PAUSE_FOR_SCREEN_PICK. @MANUAL_PAUSE lets you tell users what they’re supposed to do but make sure you tell them to RESUME and not click any Creo menus as needed. Sometimes you need a @MANUAL_PAUSE with @PAUSE_FOR_ SCREEN_PICK.
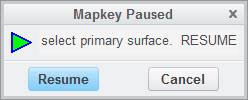
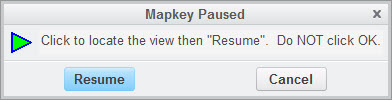
mapkey(continued) ~ Activate `visual_dlg0` `Edit`;@MANUAL_PAUSESelect primary surface. RESUME;\
mapkey(continued) @MANUAL_PAUSESelect the bottom edge or surface. RESUME;@PAUSE_FOR_SCREEN_PICK;\
Removing Duplicate Code from Mapkeys:
When inputting keyboard values, Mapkeys can create many extra lines which can make it tedious to edit later. Remove if possible but test as you go as some items cannot be simplified.
mapkey(continued) ~ Activate `visual_dlg0` `ZoneNmCreate`;\
mapkey(continued) ~ Input `visual_dlg0` `Table_INPUT` `v`;\
mapkey(continued) ~ Input `visual_dlg0` `Table_INPUT` `vi`;\
mapkey(continued) ~ Input `visual_dlg0` `Table_INPUT` `vie`;\
mapkey(continued) ~ Input `visual_dlg0` `Table_INPUT` `view`;\
mapkey(continued) ~ Input `visual_dlg0` `Table_INPUT` `view4`;\
mapkey(continued) ~ Input `visual_dlg0` `Table_INPUT` `view4d`;\
mapkey(continued) ~ Input `visual_dlg0` `Table_INPUT` `view4dx`;\
mapkey(continued) ~ Input `visual_dlg0` `Table_INPUT` `view4dxf`;\
mapkey(continued) ~ Update `visual_dlg0` `Table_INPUT` `view4dxf`;\
mapkey(continued) ~ Activate `visual_dlg0` `Table_INPUT`;\
The RMB menu commands open and closes before executing. Remove these lines and go straight to the command.
mapkey(continued) ~ Timer `UI Desktop` `UI Desktop` `popupMenuRMBTimerCB`;\
mapkey(continued) ~ Close `rmb_popup` `PopupMenu`;\
mapkey(continued) ~ Command `ProCmdDwgPageSetup@PopupMenuGraphicWinStack`;\
In general, the ARM and DISARM commands when paired next to each other do nothing:
mapkey(continued) ~ Arm `relation_dlg` `ParamsPHLay.ParTable` 2 `rowCUBE` `name`;\
mapkey(continued) ~ Disarm `relation_dlg` `ParamsPHLay.ParTable` 2 `rowCUBE` `name`;\
mapkey(continued) ~ Select `relation_dlg` `ParamsPHLay.ParTable` 2 `rowCUBE` `name`;\
In general, the OPEN and CLOSE commands when paired next to each other do nothing:
mapkey(continued) ~ Open `main_dlg_cur` `LayerActionMenu`;\
mapkey(continued) ~ Close `main_dlg_cur` `LayerActionMenu`;\
mapkey(continued) ~ Command `ProCmdLayer_SelectLayers`;\
When selecting items sometimes additional lines get added. Here’s an example where I select a parameter and designate it to Windchill:
mapkey(continued) ~ Select `relation_dlg` `ParamsPHLay.ParTable` 2 `rowDESCP` `value`;\
mapkey(continued) ~ RButtonArm `relation_dlg` `ParamsPHLay.ParTable` 2 `rowDESCP` `value`;\
mapkey(continued) ~ PopupOver `relation_dlg` `ParamsPHLay.ParamUtils` 1 `ParamsPHLay.ParTable`;\
mapkey(continued) ~ Activate `relation_dlg` `ParamsPHLay.PBUtilDesignate`;\
OS Script or executing system CMD lines
I have limited experience with using this. The final mapkey code can become hard to read as it needs \n between CMD line commands – try to space it out to multiple make it legible. James has a good example here:
How to create a drawing with same name as active model with Mapkeys
I haven’t found the ability to toggle @SYSTEM with regular mapkey commands (I’m sure it’s possible). For now, I just call it at the end of the mapkey or create a separate mapkey just to do @system commands like in James’ example.
Creating mapkeys from Trail Files
You can also copy Creo mapkey code from trail files but keep in mind there will be a lot of trail file code you don’t want in a mapkey. I would only do this once you know how to read and write mapkeys. I strongly recommend sticking with the normal mapkey method I described above in the General Tips for most cases. Here’s an example:
Re: Can a mapkey delete itself?
If you have some additional tips, please share below.