A bit of research … you can’t “change the name” using a Mapkey. There is no way to select the active material via a mapkey (impossible if there are multiple materials and a master set in an odd location in the list. Distinguishing between them is not selectable or searchable - they are just “there” for you to look at and admire - or fix… one-at-a-time...(your pain).
BUT… You can get this done! (if you think differently)
So - the trick - you have to find the old material, delete it, and load/set the new one.🤔
The Good News - The attached Excel Worksheet (BATCH_MATERIAL_REPLACE.xlsx) has everything you need (Nitro-CELL commands and process).
To Get RUNNING: You just need to download Nitro-CELL and request a FREE License (you need JLINK installed for this to work - also FREE). Recommend also getting the Excel Add-In to enable the Nitro-CELL command tooltips on the commands and options in Excel so you can better follow.
Then
Launch Nitro-CELL,
Select the Workbook in Nitro-CELL,
Load your Assembly/Parts in Creo, and
Press the “Do It!” Button.
That is it.
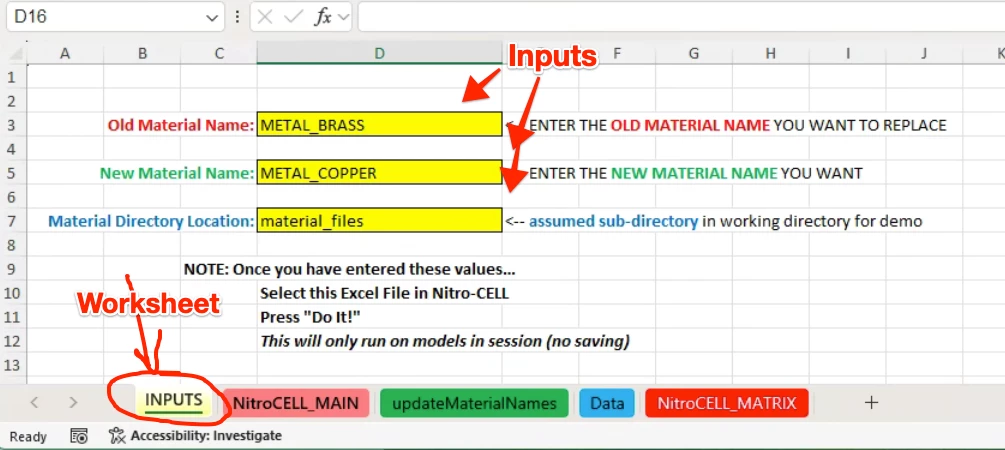
You can enter your OLD and NEW Material Names (including the directory where your material files are located) like so.
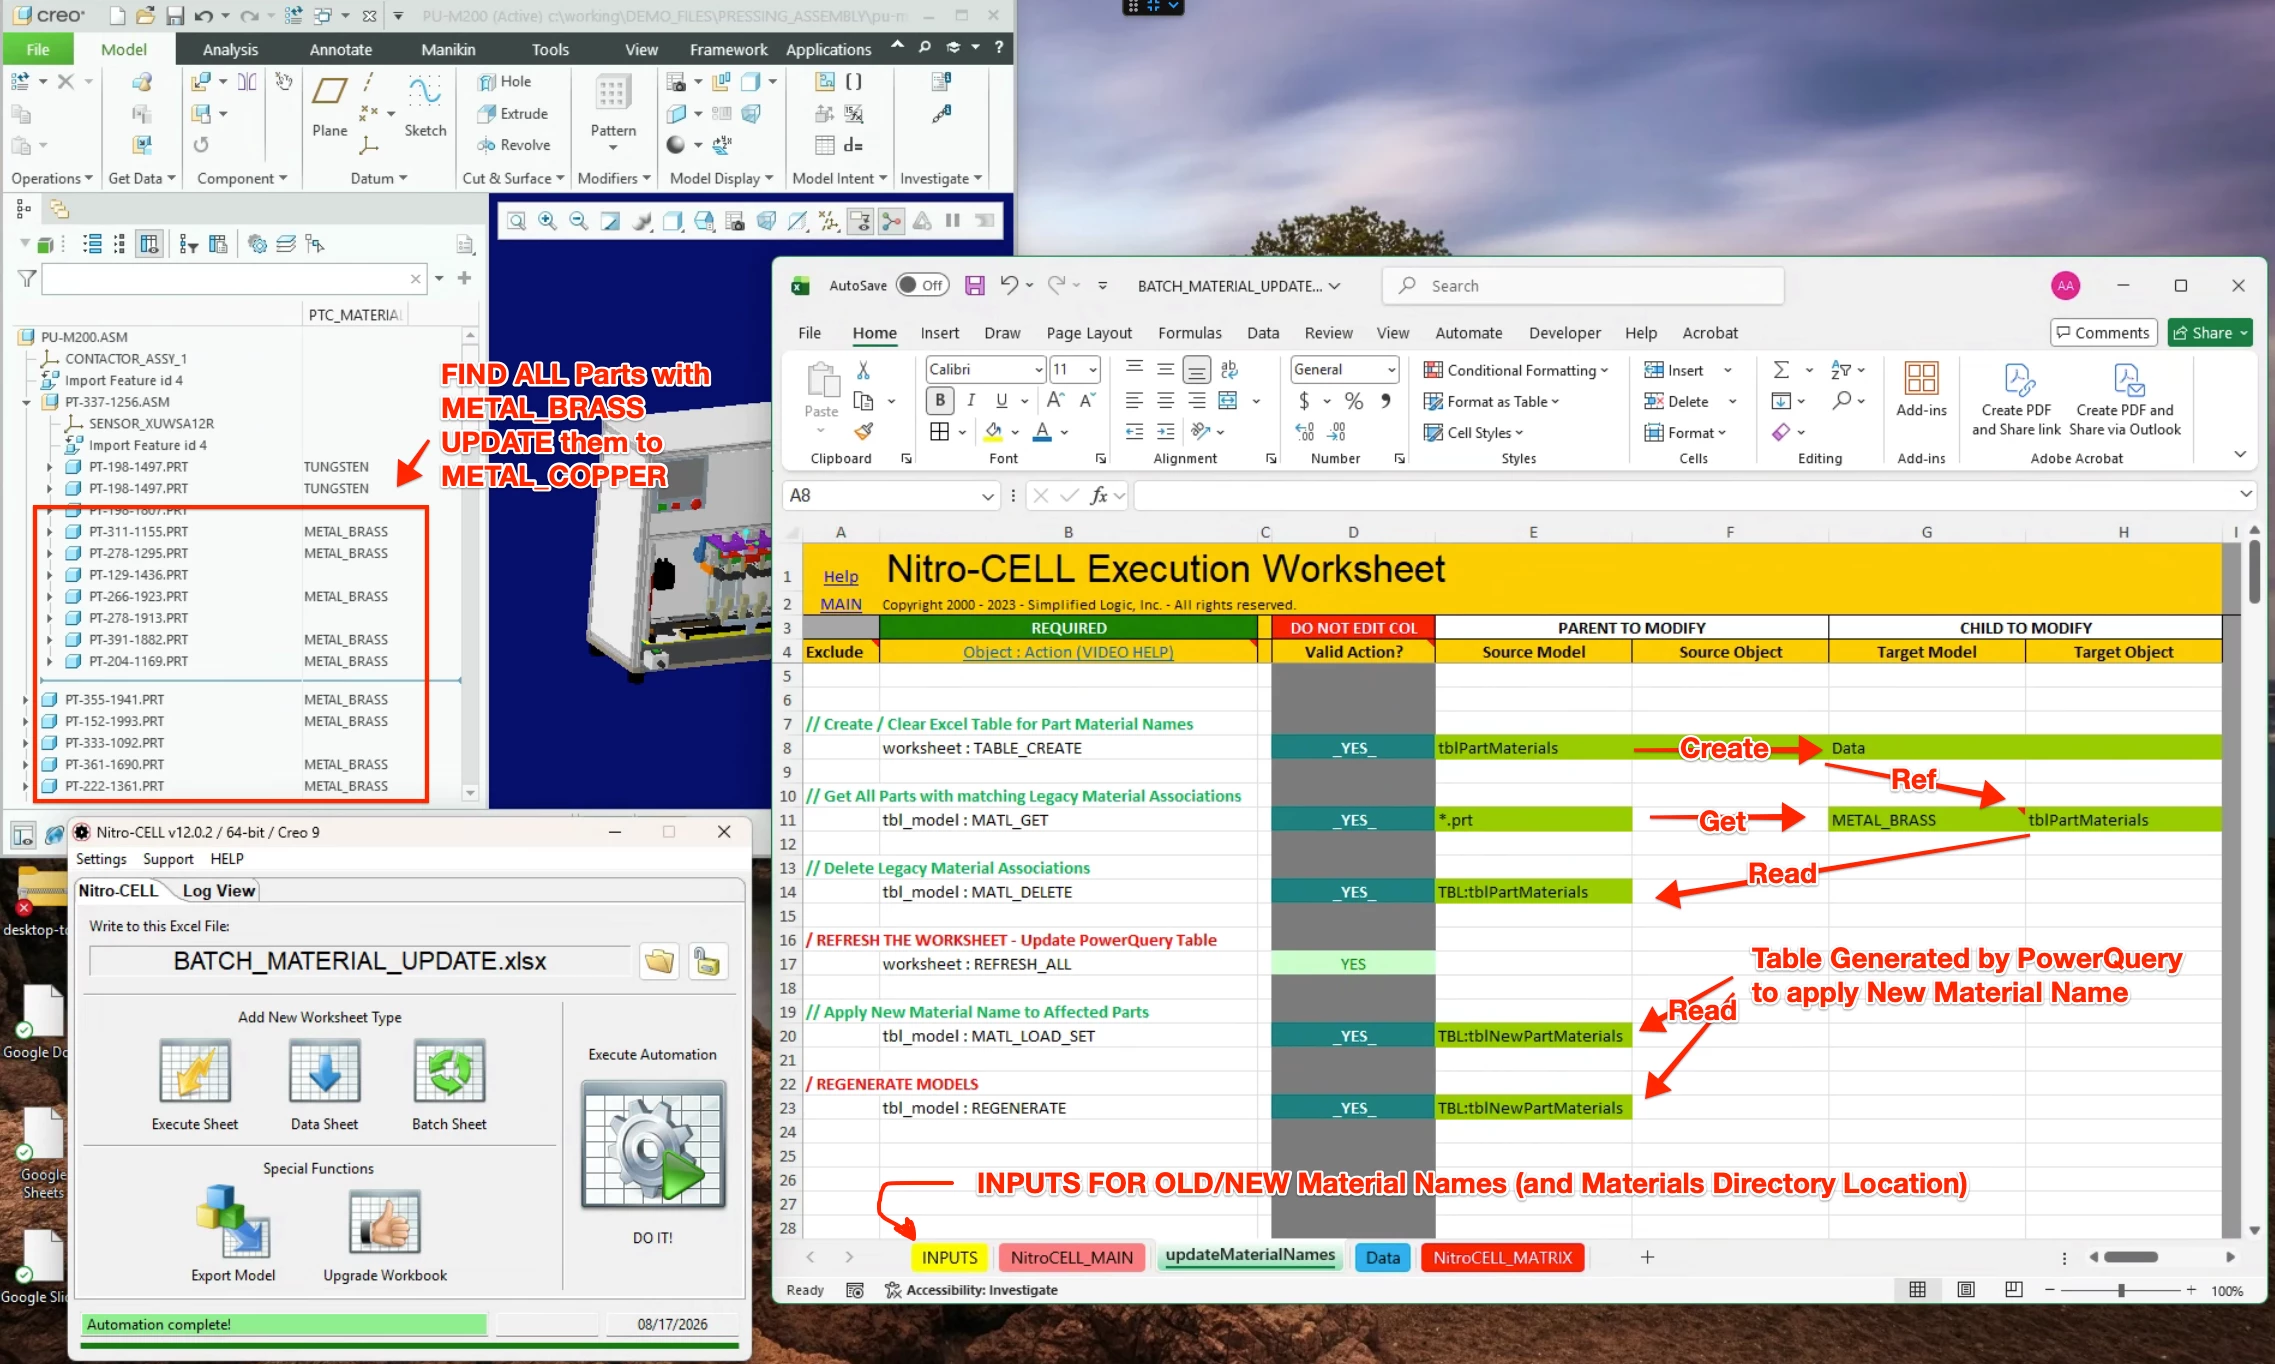
The Nitro-CELL automation will process ALL the part models currently in session and basically does this:
This finds ALL parts with your OLD Material File Name in session,
Deletes the OLD Material Names from those files
Sets the NEW Material Name to those files.
Regenerates all the updated models. (Note: you will still need a Ctrl-G to see your Model Tree Update like shown)
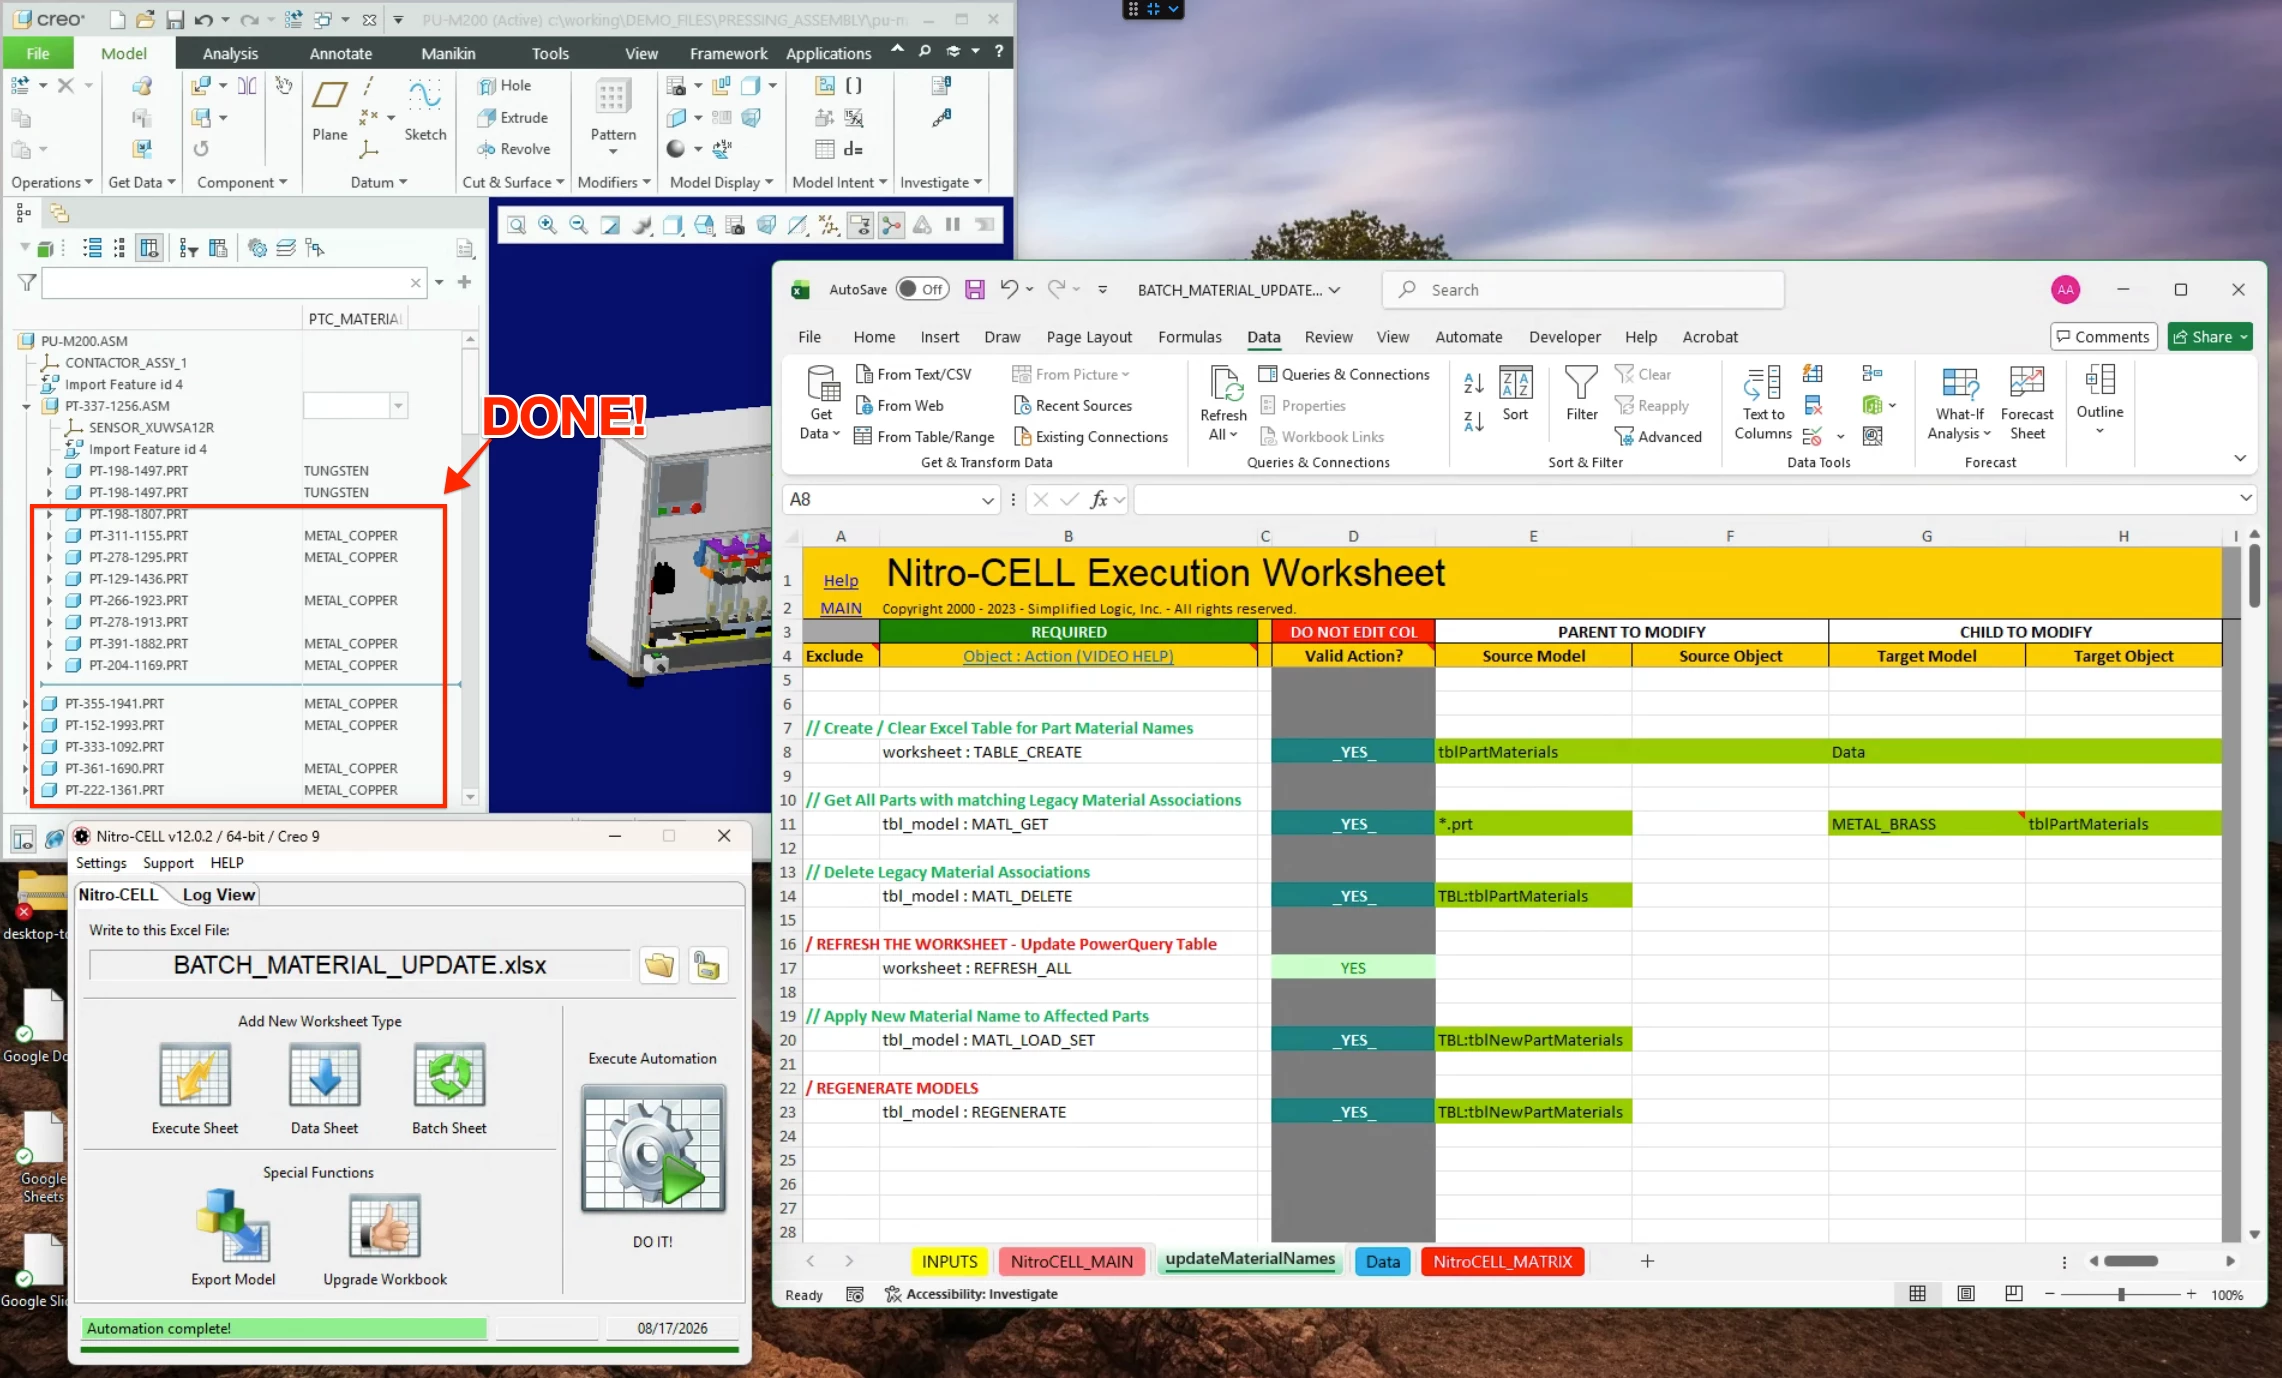
DONE! (in a few seconds)
Try with with some small assemblies to prove it is working -- then you can do more. (or extend the workbook to do other things like save the files after they are updated, or do more sophisticated batching of more files). All the commands are available to you in the FREE License.
Here is an example I ran with the automation example workbook. (I had a sub-directory where my material files were located - so in your case the new material name file is just a copy of the old file - with the new name to reference/use).
And the Result after running.
I think this solves the pain you are trying to avoid. The approach is not the one you were likely expecting, but it seems to address the need.
The Automation in Excel was built to move data and perform operations. Basically get things from Creo - send to Excel Table - transform that data into a new Excel Table. Power Query was used to leverage Excel Table data and make a new Excel Table for the modifications - this is a very cool capability. The resulting automation does not care about your models - it only looks for things that your models have - then fixes only those - same workflow everytime. A simple example of some cool things you can do with Nitro-CELL
You can check out other FREE Nitro-CELL Workbook automations here that might be useful:
I’ve never done this kind of thing before, though I have defined specific units of measure that aren’t inherently in Creo, like GSM (grams/m^2).
The procedure for doing this within Creo seems to be something like:
(1) Copy the current custom unit system, for your example copy BRAVO to CHARLIE.
(2) Set the model to use CHARLIE, replacing BRAVO.
(3) Delete BRAVO.
This assumes you already have BRAVO in every file you want ot process. Seems you can only delete custom unit systems, the others like IPS “grey out” the option to delete.
If this is the process, you could then implement some sort of batch or other repetitive process to visit all the files you want to change and do the swap. People might suggest Creo Batch. I would start a fresh Creo session, change one model, exit Creo, then use the resultant trail file to build a trail file that opens and processes all the files of interest.
If you’re conversant with Toolkit and the like, and can find the appropriate functions to do the operations, you could tackle the process that way. There are other tools, like the Nitro set of power tools that would probably make short work of the process.
This may be easy - but I am with you Ken -- typically this is a units change not a “name” change. So this is confusing to me.
If it is just a units change from kg to lbs -- this is straightforward for batch operations via CREOSON with a bit of coding or Nitro-CELL with some excel commands and an Excel Table to process the batch execution as a reference. (even if it is mapkey to pick custom “named” units.
My guess would be that they’re trying to standardize models, maybe as part of modelcheck prep? Dunno. Otherwise, to be honest, I don’t normally know or care what the name of the system of units is, I care a lot about what the units, like mm, inch, lbf, have been set to.
A bit of research … you can’t “change the name” using a Mapkey. There is no way to select the active material via a mapkey (impossible if there are multiple materials and a master set in an odd location in the list. Distinguishing between them is not selectable or searchable - they are just “there” for you to look at and admire - or fix… one-at-a-time...(your pain).
BUT… You can get this done! (if you think differently)
So - the trick - you have to find the old material, delete it, and load/set the new one.🤔
The Good News - The attached Excel Worksheet (BATCH_MATERIAL_REPLACE.xlsx) has everything you need (Nitro-CELL commands and process).
To Get RUNNING: You just need to download Nitro-CELL and request a FREE License (you need JLINK installed for this to work - also FREE). Recommend also getting the Excel Add-In to enable the Nitro-CELL command tooltips on the commands and options in Excel so you can better follow.
Then
Launch Nitro-CELL,
Select the Workbook in Nitro-CELL,
Load your Assembly/Parts in Creo, and
Press the “Do It!” Button.
That is it.
You can enter your OLD and NEW Material Names (including the directory where your material files are located) like so.
The Nitro-CELL automation will process ALL the part models currently in session and basically does this:
This finds ALL parts with your OLD Material File Name in session,
Deletes the OLD Material Names from those files
Sets the NEW Material Name to those files.
Regenerates all the updated models. (Note: you will still need a Ctrl-G to see your Model Tree Update like shown)
DONE! (in a few seconds)
Try with with some small assemblies to prove it is working -- then you can do more. (or extend the workbook to do other things like save the files after they are updated, or do more sophisticated batching of more files). All the commands are available to you in the FREE License.
Here is an example I ran with the automation example workbook. (I had a sub-directory where my material files were located - so in your case the new material name file is just a copy of the old file - with the new name to reference/use).
And the Result after running.
I think this solves the pain you are trying to avoid. The approach is not the one you were likely expecting, but it seems to address the need.
The Automation in Excel was built to move data and perform operations. Basically get things from Creo - send to Excel Table - transform that data into a new Excel Table. Power Query was used to leverage Excel Table data and make a new Excel Table for the modifications - this is a very cool capability. The resulting automation does not care about your models - it only looks for things that your models have - then fixes only those - same workflow everytime. A simple example of some cool things you can do with Nitro-CELL
You can check out other FREE Nitro-CELL Workbook automations here that might be useful: