
1-Visitor
September 18, 2017
Solved

Weather App with ESP8266

  • September 18, 2017
  • 2 replies
  • 8839 views

Weather App with ESP8266

I try to connect a DHT22 sensor by ESP82266 and send the data to the Thingworx.

I tried to edit the Weather App with Arduino Uno Codes. I can connect the Thingworx server.

But I have been unable to show the data from the sensor in the Thingworx platform,

The Serial Monitor show the information as below

################################################################

Connected to AndroidAP

IP address: 192.168.43.142

Thingwork Server connected

POST /Thingworx/Things/HTU21DThing/Services/setTempAndHumid?appKey=287b9c77-983c-4abf-9f75-4fc273c7183a&method=post&x-thingworx-session=true<&Temp=25.20&Humid=45.80> HTTP/1.1

Host: ohimvo0g.studio-trial.thingworx.io

Content-Type: text/html

Thingwork Server connected

POST /Thingworx/Things/HTU21DThing/Services/setTempAndHumid?appKey=287b9c77-983c-4abf-9f75-4fc273c7183a&method=post&x-thingworx-session=true<&Temp=25.20&Humid=45.70> HTTP/1.1

Host: ohimvo0g.studio-trial.thingworx.io

Content-Type: text/html

################################################################

The Original Code.

https://www.thingworx.com/ecosystem/academic-program/iot-projects/weather-app-arduino-uno/

Here is my code that I have been using in ESP8266:

------------------------------------------------------------------------------------------------------------------------

// Temp and Humid

  #include "DHT.h"

  #define DHTPIN 10     // what digital pin we're connected to

  #define DHTTYPE DHT22   // DHT 22  (AM2302), AM2321

//WiFi

  #include <ESP8266WiFi.h>

  const char* ssid = "AndroidAP";

  const char* password = "nslc3250x5589";

// The IP address will be dependent on your local network:

char server[] = "ohimvo0g.studio-trial.thingworx.io";

WiFiClient client;

//ThingWorx App key which replaces login credentials)

char appKey[] = "287b9c77-983c-4abf-9f75-4fc273c7183a";

// ThingWorx Thing name for which you want to set properties values

char thingName[] = "HTU21DThing";

// ThingWorx service that will set values for the properties you need

// See the documentation for this tutorial for more information

char serviceName[] = "setTempAndHumid";

//Initialize an HTU21D library object to read

// temperature and humidity data from your connected sensor

DHT dht(DHTPIN, DHTTYPE);

void setup() {

  // start serial port:

  Serial.begin(9600);

  while (!Serial) {

    ; // wait for serial port to connect. Needed for Leonardo only

  }

//initialize HTU21D object to read values from sensors

   dht.begin();

  // start the Wifi connection:

Serial.println("Trying to get an IP address using DHCP");

  WiFi.begin(ssid, password);

Serial.println("");

// Wait for connection

  while (WiFi.status() != WL_CONNECTED) {

    delay(500);

Serial.print(".");

  }

Serial.println("");

Serial.print("Connected to ");

Serial.println(ssid);

Serial.print("IP address: ");

Serial.println(WiFi.localIP());

}

void loop() {

  // Aquire sensor values

  float Temp =  dht.readTemperature();

  float Humid = dht.readHumidity();

  //through REST calls to your TWX server

  // if you get a connection, report back via serial:


  if (client.connect(server, 8443)) {

    Serial.println("Thingwork Server connected");

    // send the HTTP POST request:

client.print("POST /Thingworx/Things/");

client.print(thingName);

client.print("/Services/");

client.print(serviceName);

client.print("?appKey=");

client.print(appKey);

client.print("&method=post");

client.print("&x-thingworx-session=true");

client.print("<");

client.print("&");

client.print("Temp");

client.print("=");

client.print(Temp);

client.print("&");

client.print("Humid");

client.print("=");

client.print(Humid);

client.print(">");

client.println(" HTTP/1.1");

client.print("Host: ");

client.println(server);

client.println("Content-Type: text/html");

    client.println();

    client.stop();

    // print the request out

Serial.print("POST /Thingworx/Things/");

Serial.print(thingName);

Serial.print("/Services/");

Serial.print(serviceName);

Serial.print("?appKey=");

Serial.print(appKey);

Serial.print("&method=post");

Serial.print("&x-thingworx-session=true");

Serial.print("<");

Serial.print("&");

Serial.print("Temp");

Serial.print("=");

Serial.print(Temp);

Serial.print("&");

Serial.print("Humid");

Serial.print("=");

Serial.print(Humid);

Serial.print(">");

Serial.println(" HTTP/1.1");

Serial.print("Host: ");

Serial.println(server);

Serial.println("Content-Type: text/html");

    Serial.println();

}

  else {

    // kf you didn't get a connection to the server:

Serial.println("the connection could not be established");

    client.stop();

  }

}

----------------------------------------------------------------------------------------------

I´d appreciate if anyone can help me, thanks.
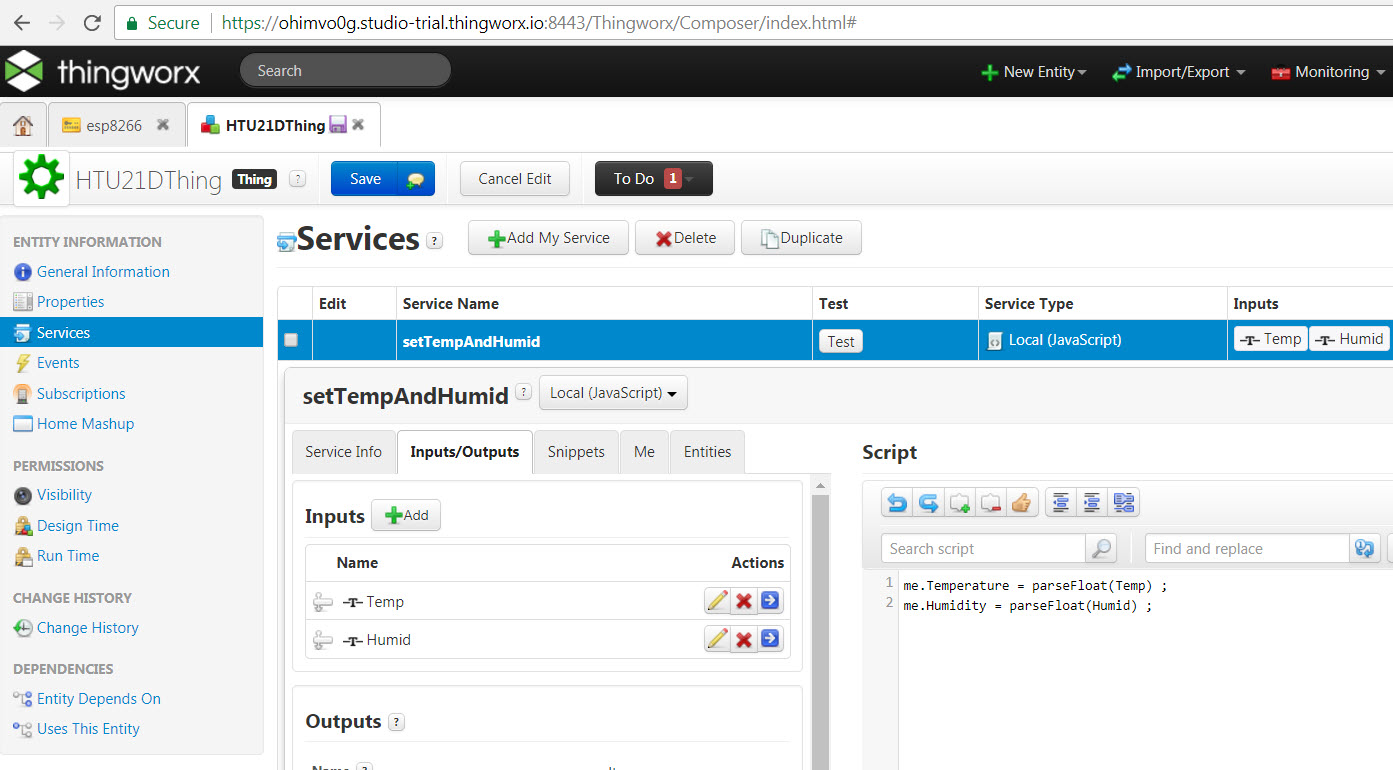
esp8266-thingwork.jpg

Best answer by bmehringer

I used the below script in an Adafruit Huzzah Feather to set a Thing Property value (PUT request).  I used a DS18B20 to get the temp, but it should be easy to reuse the code and just change out the source of the variable being sent to Thingworx.  You will need to update the following sections in the script:

<YOUR_WIFI_SSID>

<YOUR_WIFI_PASSWORD>

<THINGWORX_SERVER_NAME_OR_IP>

<THINGWORX_SERVER_PORT>

<YOUR_THING>

<YOUR_PROPERTY>

<YOUR_APP_KEY>

Code Starts Below-------:

/*******************   Libraries *************************/
#include <ESP8266WiFi.h>
#include <WiFiClient.h>
#include <OneWire.h>
#include <DallasTemperature.h>

/*******************   Temperature Sensor (DS18B20) Setup   ************/
// Data wire microcontroller pin
#define ONE_WIRE_BUS 2

// Setup a oneWire instance to communicate with any OneWire devices (not just Maxim/Dallas temperature ICs)
OneWire oneWire(ONE_WIRE_BUS);

// Pass our oneWire reference to Dallas Temperature.
DallasTemperature sensors(&oneWire);

/******************   WiFi Setup   *********************************/
const char* ssid = "<YOUR_WIFI_SSID>";
const char* password = "<YOUR_WIFI_PASSWORD>";

const char* host = "<THINGWORX_SERVER_NAME_OR_IP>"; // ThingWorx Server IP Address
const int httpsPort = <THINGWORX_SERVER_PORT>;

WiFiClient client;


void setup() {
  Serial.begin(115200);
  Serial.println();
  Serial.print("connecting to ");
  Serial.println(ssid);
  WiFi.begin(ssid, password);
  while (WiFi.status() != WL_CONNECTED) {
    delay(500);
    Serial.print(".");
  }
  Serial.println("");
  Serial.println("WiFi connected");
  Serial.println("IP address: ");
  Serial.println(WiFi.localIP());;

  // Start up the DS18B20 sensor
  sensors.begin();


}

void loop() {
  // Get the Temp from the sensor(s)
  sensors.requestTemperatures(); // Send the command to get temperatures

  // There is only one sensor connected, so get it from sensor index 0
  float tempF = sensors.getTempFByIndex(0);
  String strTempF = String(tempF);
  Serial.print("Temp: ");
  Serial.println(strTempF);


  // Use WiFiClientSecure class to create TLS connection
  Serial.println(host);
  if (!client.connect(host, httpsPort)) {
    Serial.println("connection failed");
    return;
  }else{
    Serial.println("Connected to ThingWorx.");
  }

  String url = "/Thingworx/Things/<YOUR_THING>/Properties/<YOUR_PROPERTY>";
  Serial.print("requesting URL: ");
  Serial.println(url);

  String strPUTReqVal = "{\"Temp\":\"" + strTempF + "\"}";
  Serial.print("PUT Value: ");
  Serial.println(strPUTReqVal);

  client.print(String("PUT ") + url + " HTTP/1.1\r\n" +
               "Host: " + host + "\r\n" +
               "appKey: <YOUR_APP_KEY>" + "\r\n" +
               "x-thingworx-session: false" + "\r\n" +
               "Accept: application/json" + "\r\n" +
               "Connection: close" + "\r\n" +
               "Content-Type: application/json" + "\r\n" +
               "Content-Length: " + String(strPUTReqVal.length()) + "\r\n\r\n" +
               strPUTReqVal+ "\r\n\r\n");
   
  while (client.connected()) {
    String line = client.readStringUntil('\r');
    Serial.print(line);
  }
  client.stop();

  // Run this every 5 seconds
  delay(5000);
}

2 replies

17-Peridot
September 18, 2017

Hi Adam Sanordontri,

Could you please try the following and see if it works?

Find the line char server[] = "ohimvo0g.studio-trial.thingworx.io"; in the code and update to char server[] = "ohimvo0g.studio-trial.thingworx.io:8443";


Save and upload the program to your ESP8266 board.

Go back to your HTU21D Thing properties section, click on the refresh properties button and see if the values are being updated constantly.

If this doesn't solve the issue you can revert to original settings.

1-Visitor
September 19, 2017

I tried yo add :8443 for the server port .

The Serial Monitor show the information as below

Connected to AndroidAP

IP address: 192.168.43.142

the connection could not be established

the connection could not be established

the connection could not be established

the connection could not be established

the connection could not be established

the connection could not be established

the connection could not be established

the connection could not be established

the connection could not be established

the connection could not be established

17-Peridot
September 19, 2017

Hi Adam Sanordontri,

I apologize for the inconvenience. Could you please revert the settings to the default, run the code on ESP8266 board and see if you can find any errors in the application log.

1-Visitor
April 15, 2018

I have same problem here have you reach to any solution for this problem ?

"the connection could not be established"

why it couldn't reach server !!

1-Visitor
April 18, 2018

I had troubles getting my ESP8266 to connect until I started using the IP address instead of the server name.  I am no where near a network person, so I have no idea why the IP worked and the server name did not.