13-Aquamarine
January 15, 2025
Solved

Star shape -- how to get a simple spine

  • January 15, 2025
  • 2 replies
  • 3112 views

Does anyone know how to construct that star shape with a simple white spine?
I cannot get rid of the central lines generated by the corners of the three spikes, tried blending to a point or to a smaller star point, to no avail.
And when trying to round those corners with an arc, I am having issues with connectivity between the arcs and the segments, and I am not able to get rid of those errors (no idea how to deal with them).

Any suggestion is welcome!!

Best answer by tbraxton

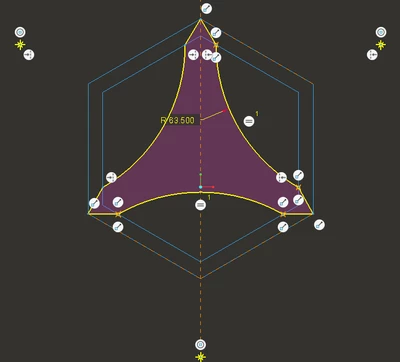
Fully constrained sketch of the shape using your example pic as construction reference. This is not the only way to get this sketch done, it is based on the reference image you provided. I used the hexagons in 1 sketch as the reference to create the "star" shape.  As indicated by the shade region the sketch is closed. I did not have to use any trimming operations to get this result.


In Creo Parametric, one should in general keep sketches as simple as possible. This is why I used 2 sketches to make this.


This same sketch can be created in a single sketch using two concentric construction circles in rather than the hexagons.


tbraxton_0-1737393172443.png


2 replies

19-Tanzanite
January 15, 2025

What's your model's accuracy setting?

13-Aquamarine
January 17, 2025

Thank you, I bumped it up to max, but nothing changed.

KenFarley
21-Topaz II
January 17, 2025

Saying the accuracy was set to "max" doesn't mean anything. For this type of touchy geometry it is always  advisable to have two things:

(1) Absolute accuracy. I believe this is the default for Creo in the latest versions, but still, if a start part from "the before times" is used, it might have the accuracy set to "relative', which is garbage.

(2) Set the absolute accuracy to a very SMALL value. What that is depends on your particular units of measure. For me, with inch based models, I use 1.0E-05. Often when models are doing weird things at tangencies, and the like, this will fix things. Then again, if you muck about with this setting on old models that were originally built with relative accuracy, this can cause troubles, particularly with complex surfaces.


Hopefully it's something like this that is causing your difficulties.

tbraxton
22-Sapphire II
tbraxton22-Sapphire IIAnswer
22-Sapphire II
January 20, 2025

Fully constrained sketch of the shape using your example pic as construction reference. This is not the only way to get this sketch done, it is based on the reference image you provided. I used the hexagons in 1 sketch as the reference to create the "star" shape.  As indicated by the shade region the sketch is closed. I did not have to use any trimming operations to get this result.


In Creo Parametric, one should in general keep sketches as simple as possible. This is why I used 2 sketches to make this.


This same sketch can be created in a single sketch using two concentric construction circles in rather than the hexagons.


tbraxton_0-1737393172443.png


13-Aquamarine
February 21, 2025

The lines in the middle are still there, regardless of the closed sketch.
This was about obtaining a smooth surface inside the star when I perform the BLEND, I cannot get rid of the green lines that I drew in the attached picture.
 

kdirth
21-Topaz I
21-Topaz I
February 21, 2025

Are you trying to create a surface with a boundary blend from the sketch?  Boundary blend always creates lines between vertices on each side.


If you are creating a planer surface, use Fill.

There is always more to learn.